Dragon Quest 3 Remake: Zoma\'s Citadel Walkthrough
Author : Riley
Jan 22,2025
Dragon Quest 3 Remake: Conquering Zoma's Citadel – A Comprehensive Guide
This guide provides a complete walkthrough of Zoma's Citadel in Dragon Quest 3 Remake, the game's climactic dungeon, detailing treasure locations and boss strategies. Prepare for the ultimate test of your party's skills!
Reaching Zoma's Citadel
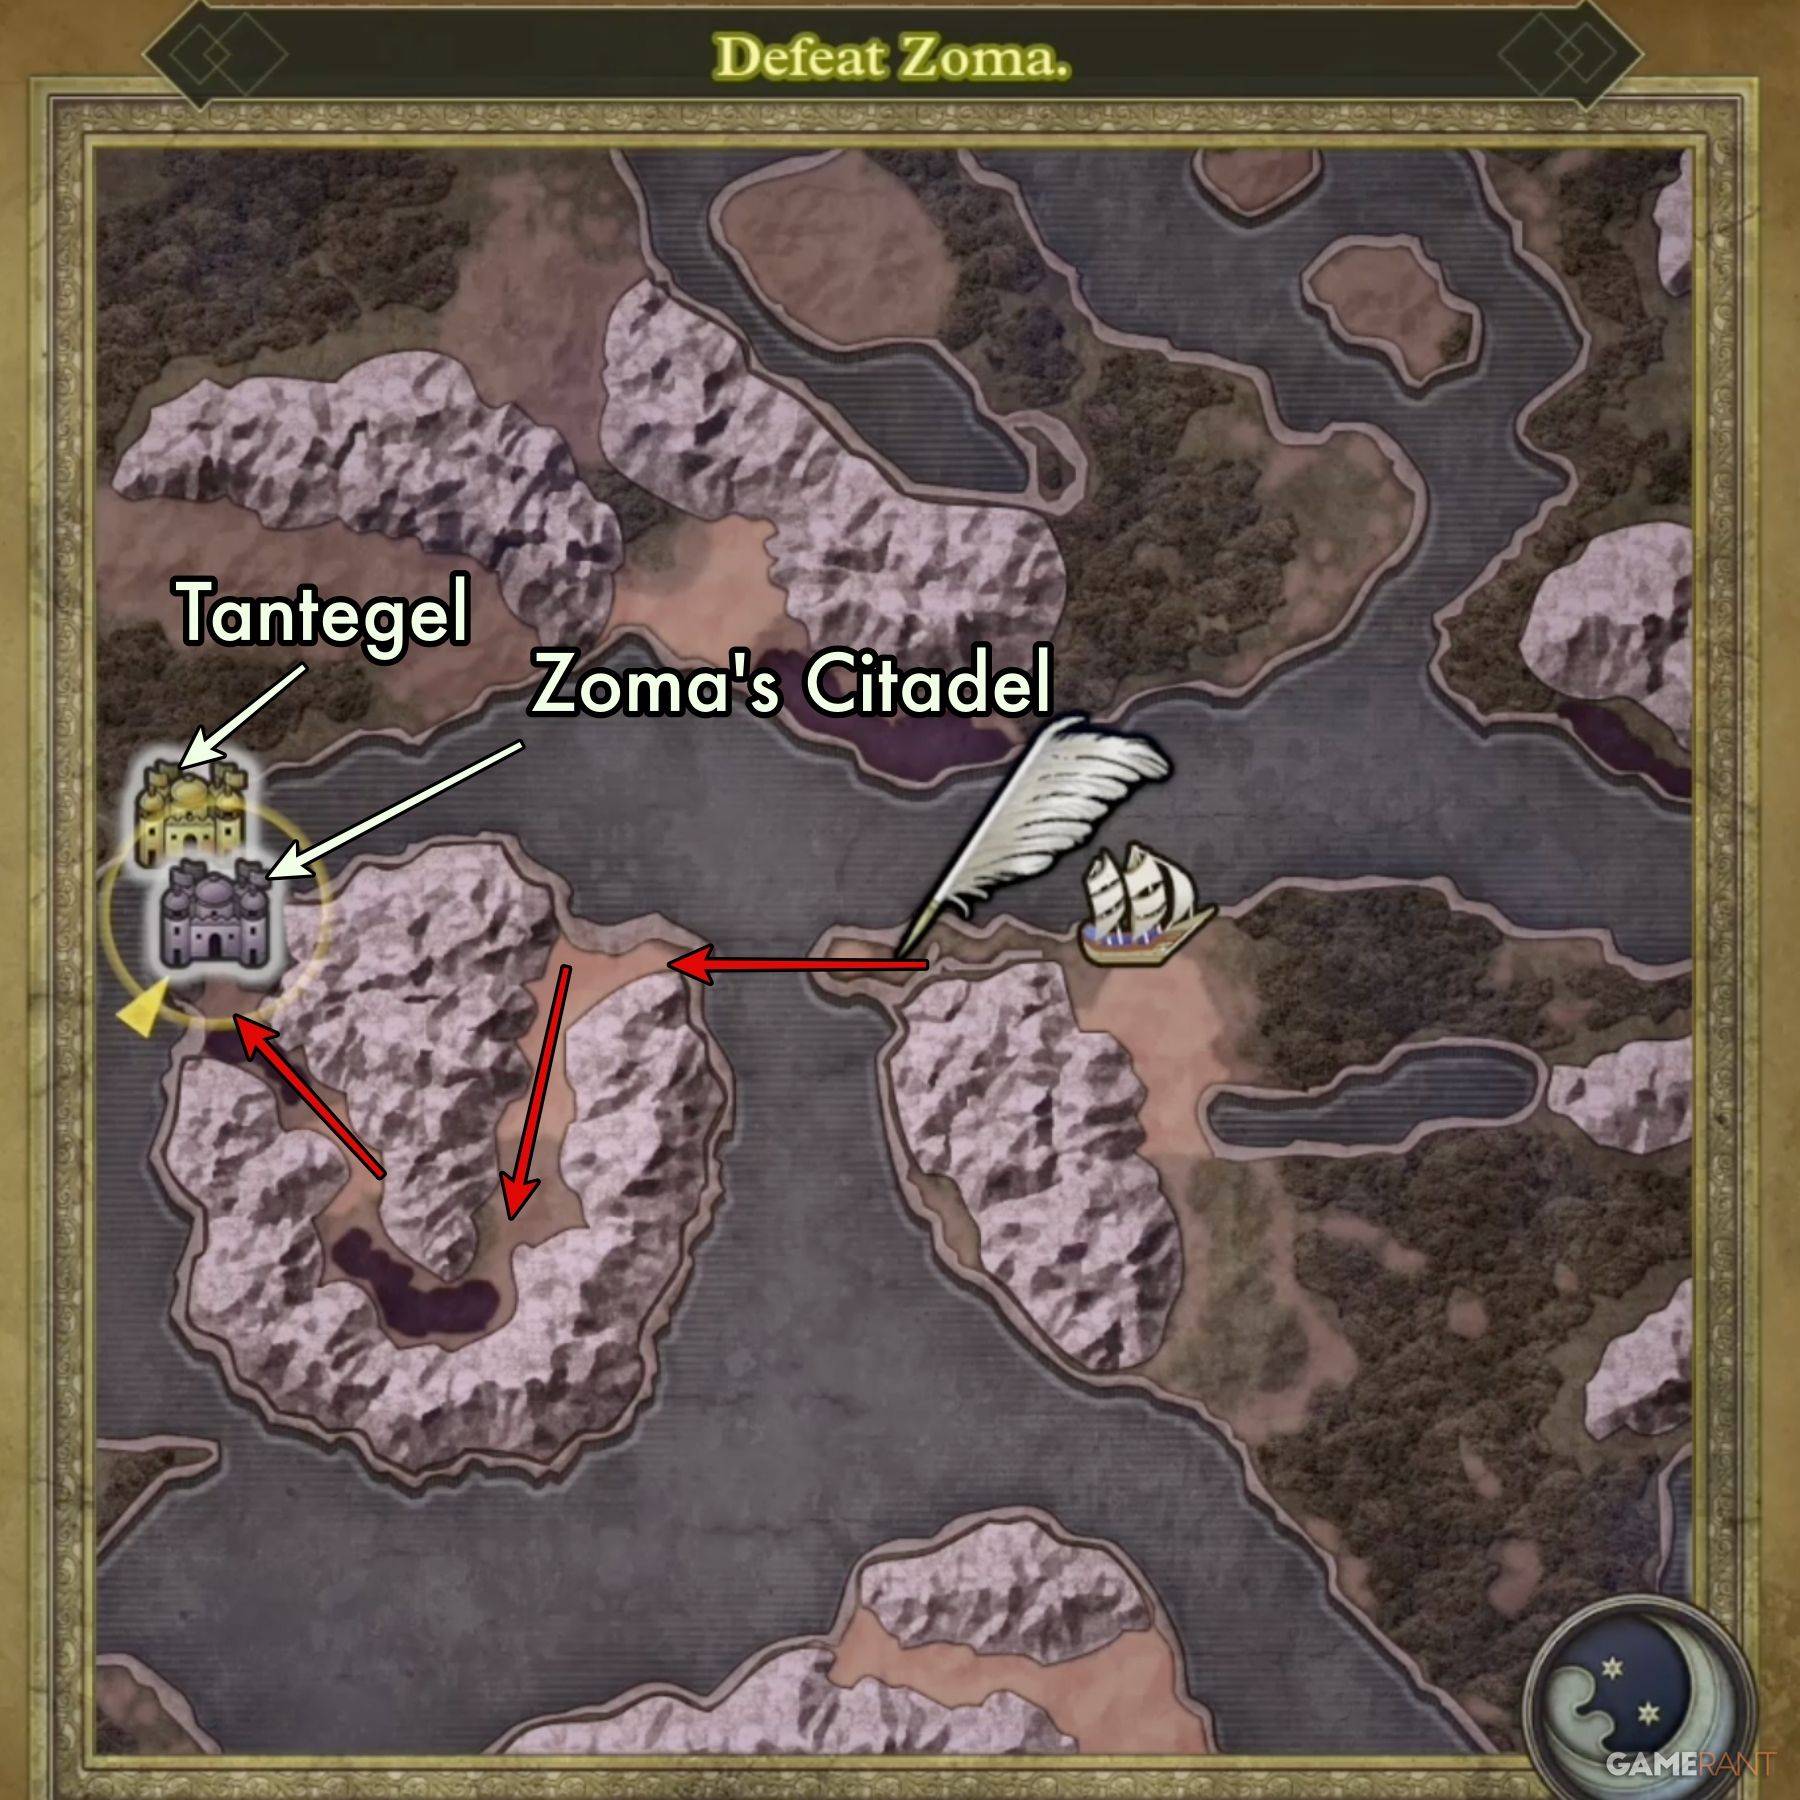
After defeating Baramos, you'll enter Alefgard's perpetually dark world. To reach Zoma's Citadel, you must obtain the Rainbow Drop:
- Sunstone: Found in Tantegel Castle.
- Staff of Rain: Located in the Shrine of the Spirit.
- Sacred Amulet: Received from Rubiss after rescuing her in the Tower of Rubiss (requires the Faerie Flute).
Combine these items to create the Rainbow Drop and build the Rainbow Bridge, leading you to the Citadel.
Zoma's Citadel 1F Walkthrough
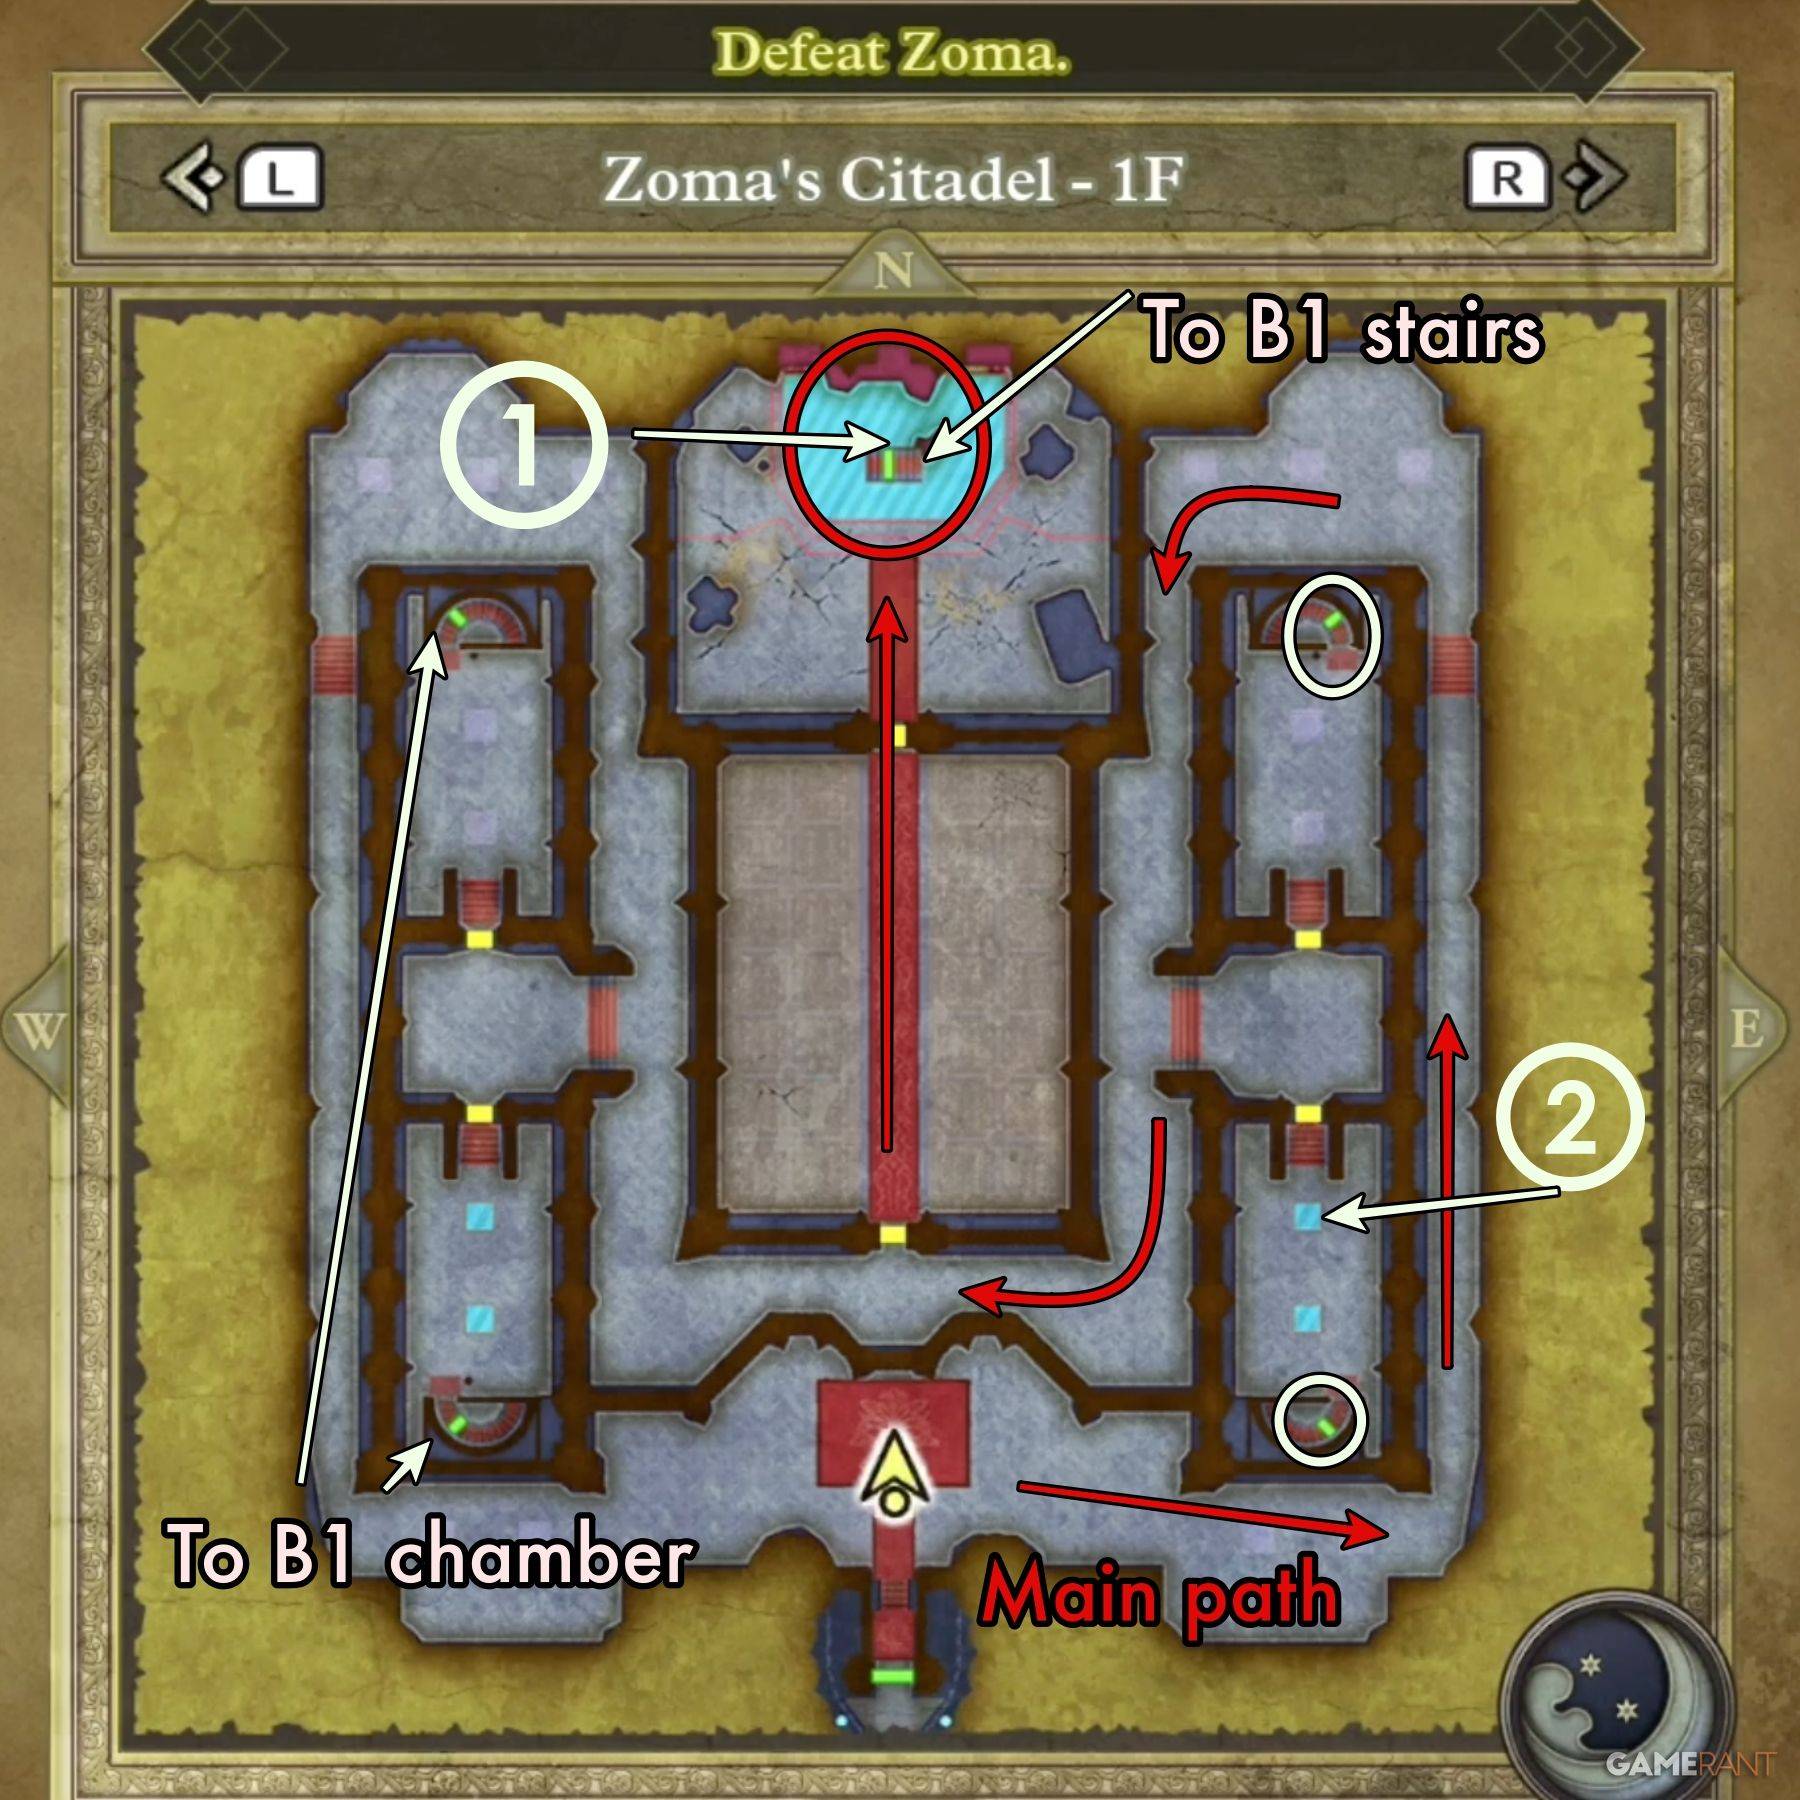
Navigate the first floor to reach the throne in the northern wall. This throne moves to reveal a hidden passage. Explore both east and west sides for treasure. Expect a challenging encounter with Living Statues in the central chamber.
1F Treasure:
- Treasure 1 (Buried): Mini Medal (behind the throne).
- Treasure 2 (Buried): Seed of Magic (near the electrified panel).
Zoma's Citadel B1 Walkthrough
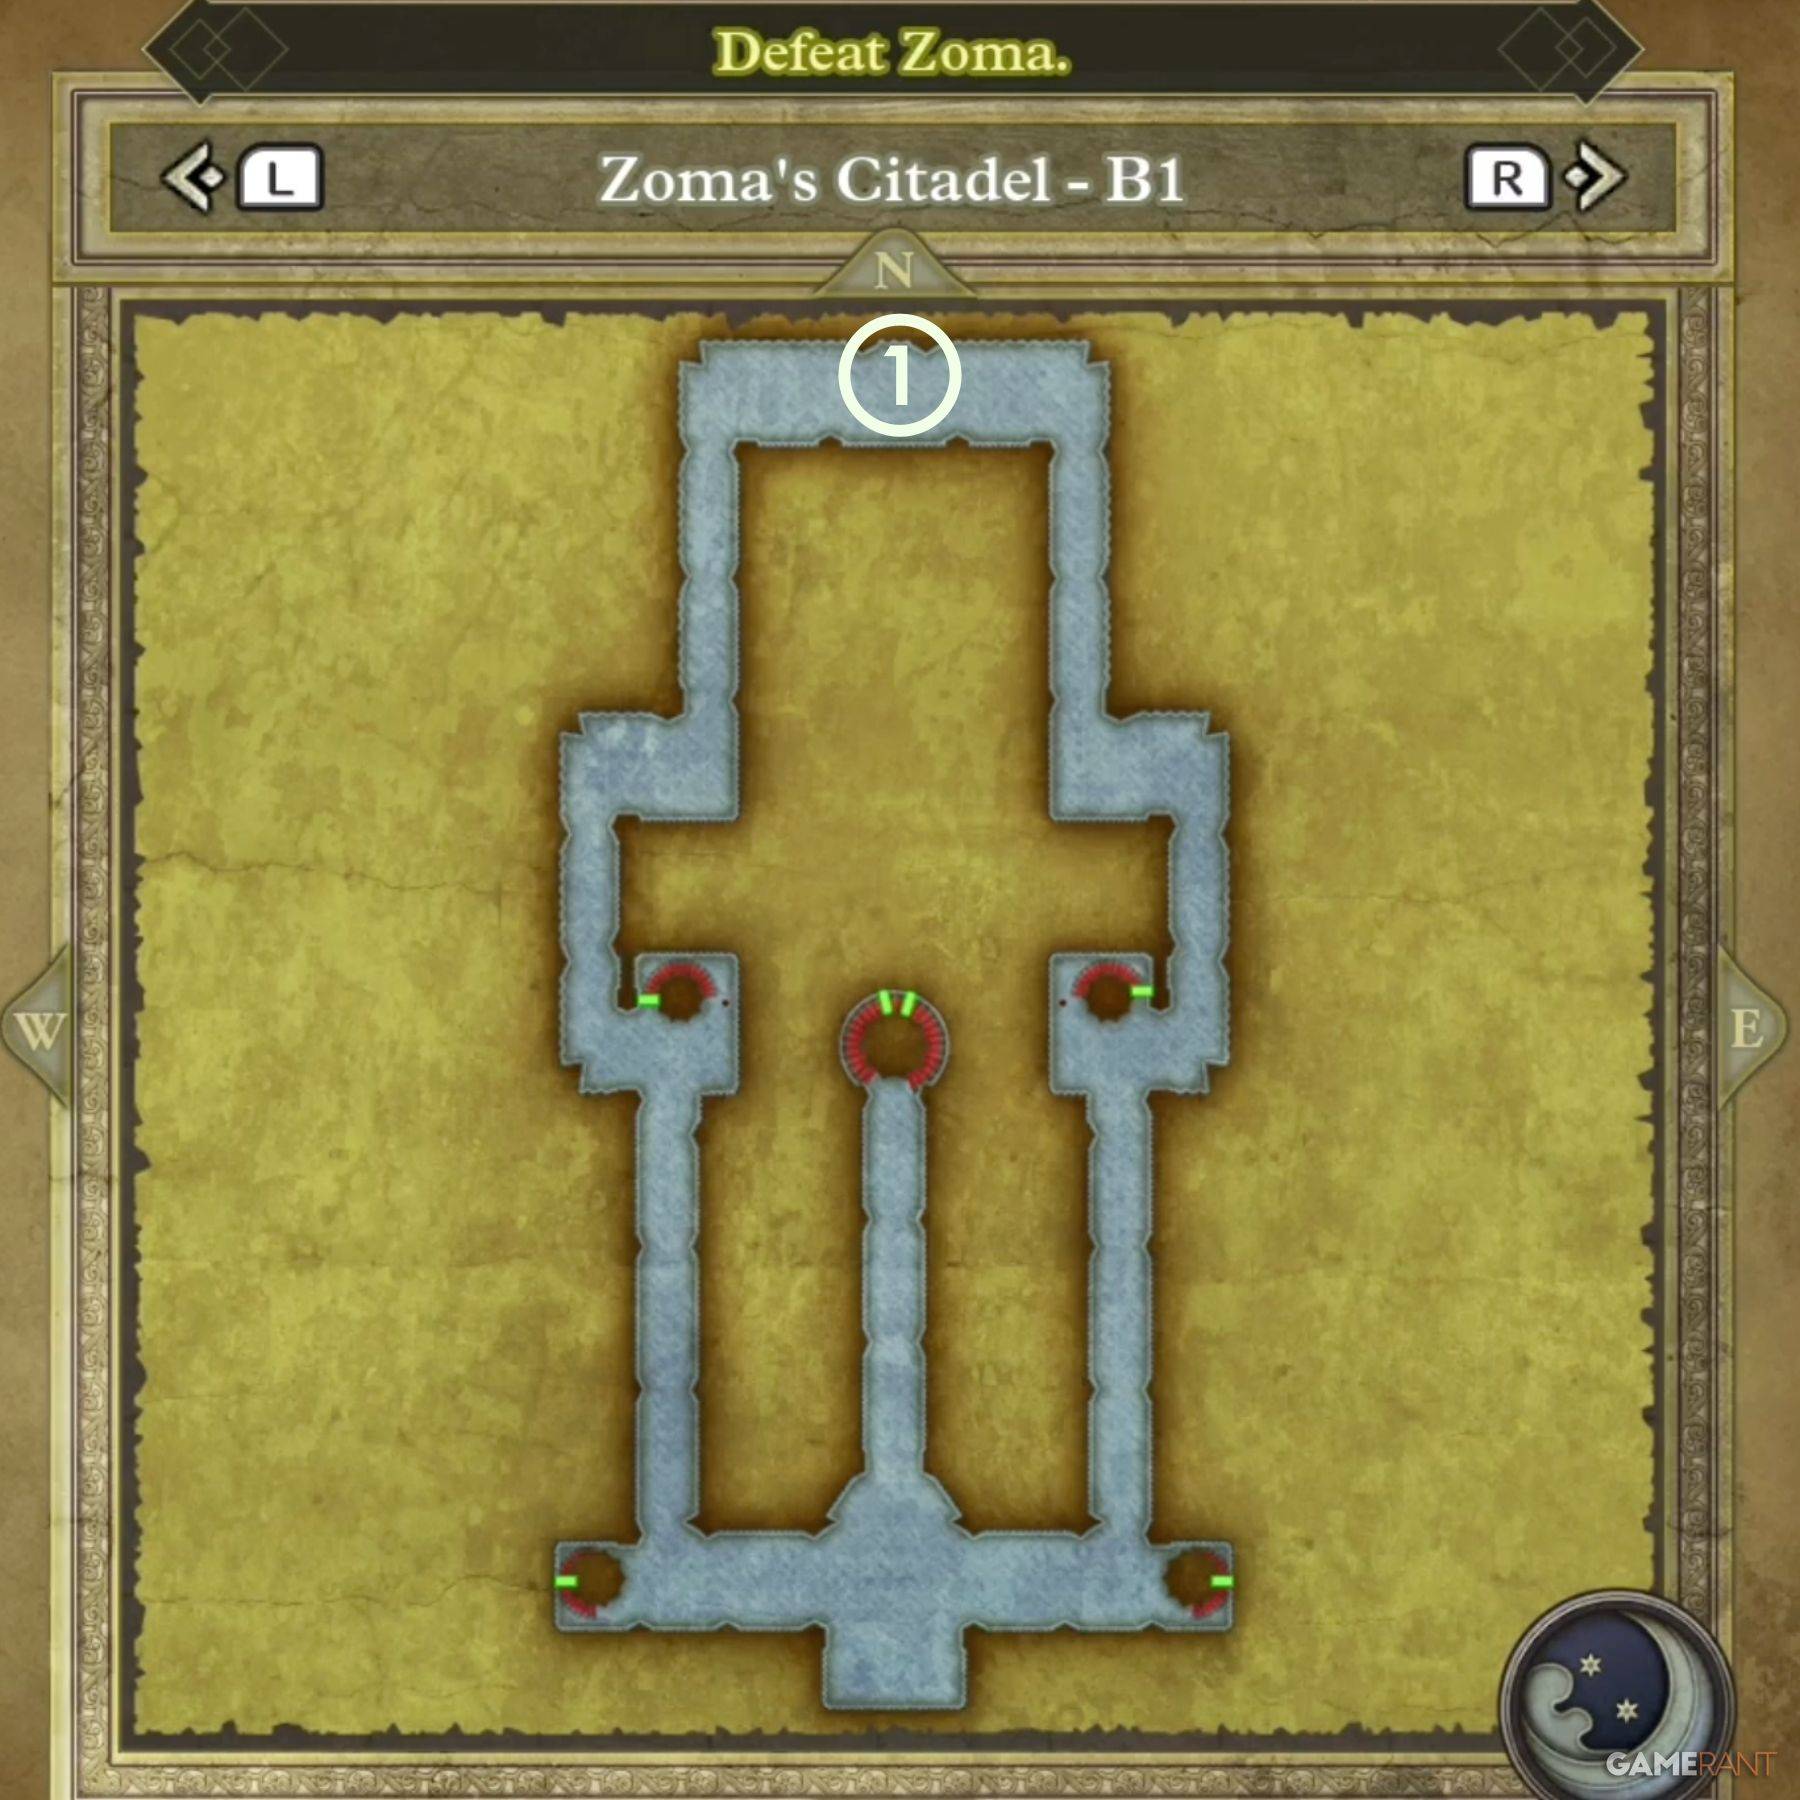
The main path leads directly to B2. However, taking the stairs in the 1F chambers leads to an isolated B1 area containing a single chest.
B1 Treasure:
- Treasure 1 (Chest): Hapless Helm
Zoma's Citadel B2 Walkthrough

B2 features directional tiles. The goal is to reach the opposite side and descend the stairs. Practice using the similar tiles in the Tower of Rubiss (3rd floor, northwest corner) if needed. The tiles use a diamond pattern: blue for North/South, orange for East/West. Use the D-pad accordingly.
B2 Treasure:
- Treasure 1 (Chest): Scourge Whip
- Treasure 2 (Chest): 4,989 Gold Coins
Zoma's Citadel B3 Walkthrough
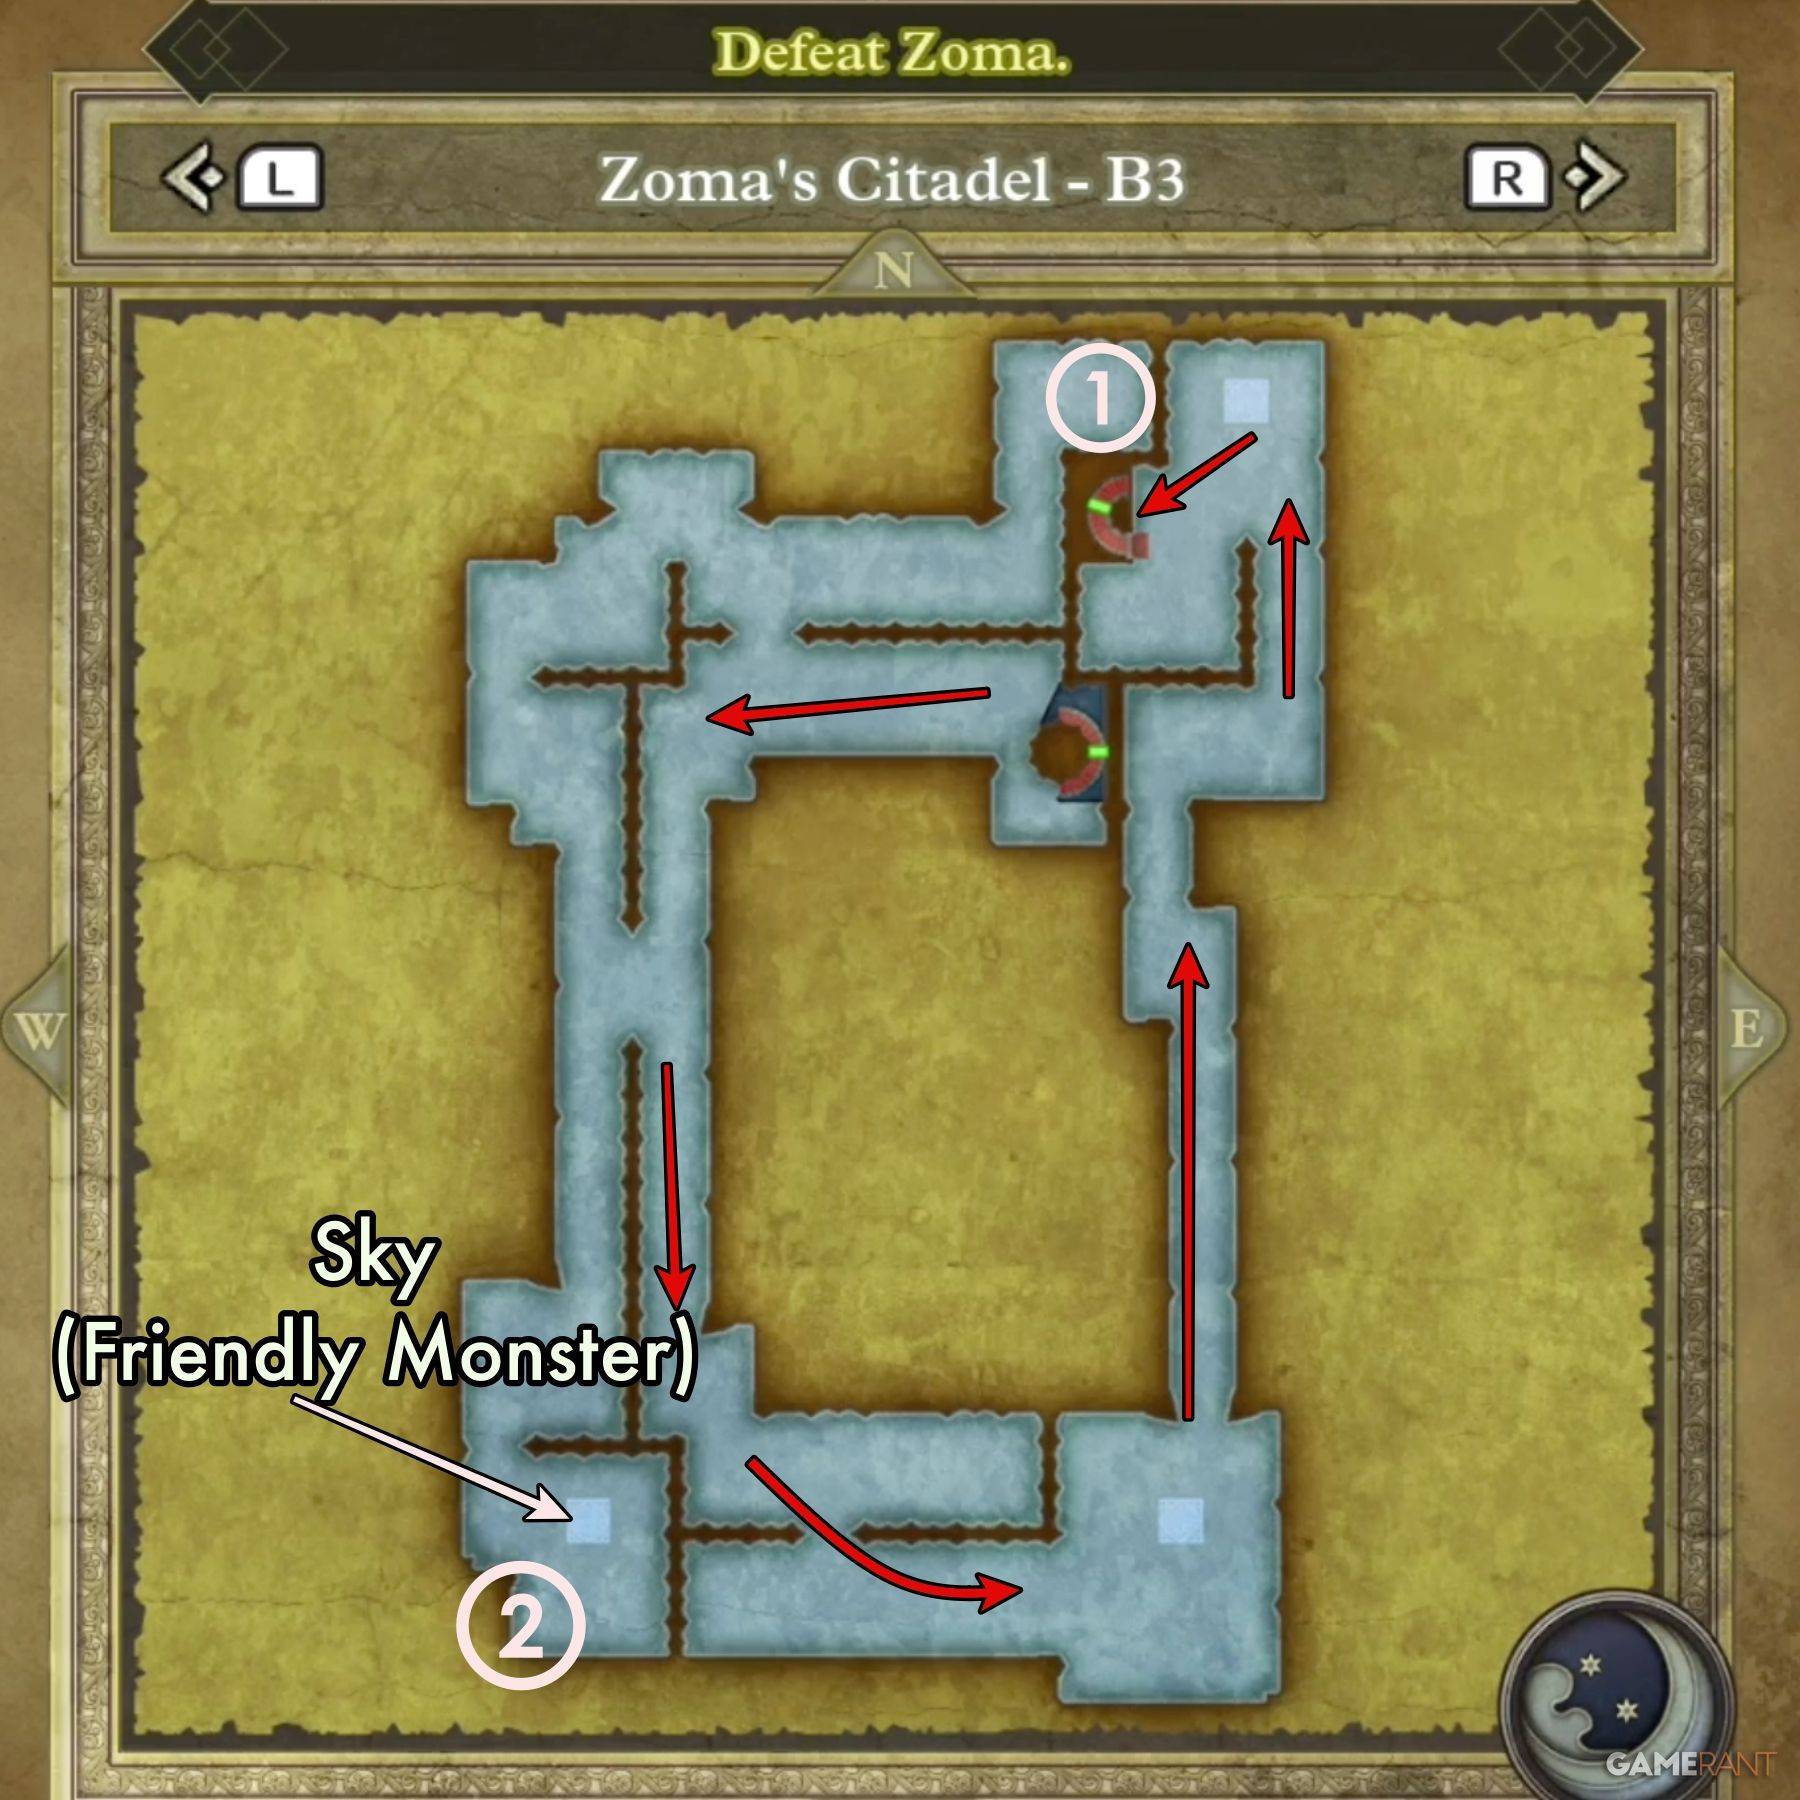
Follow the outer edge of the chamber on B3. A detour to the southwest reveals Sky, a friendly Soaring Scourger. Falling through holes on B2 leads to an isolated chamber with another friendly monster, a Liquid Metal Slime, and a chest.
B3 Treasure:
Main Chamber:
- Treasure 1 (Chest): Dragon Dojo Duds
- Treasure 2 (Chest): Double-Edged Sword
Isolated Chamber:
- Treasure 1 (Chest): Bastard Sword
Zoma's Citadel B4 Walkthrough
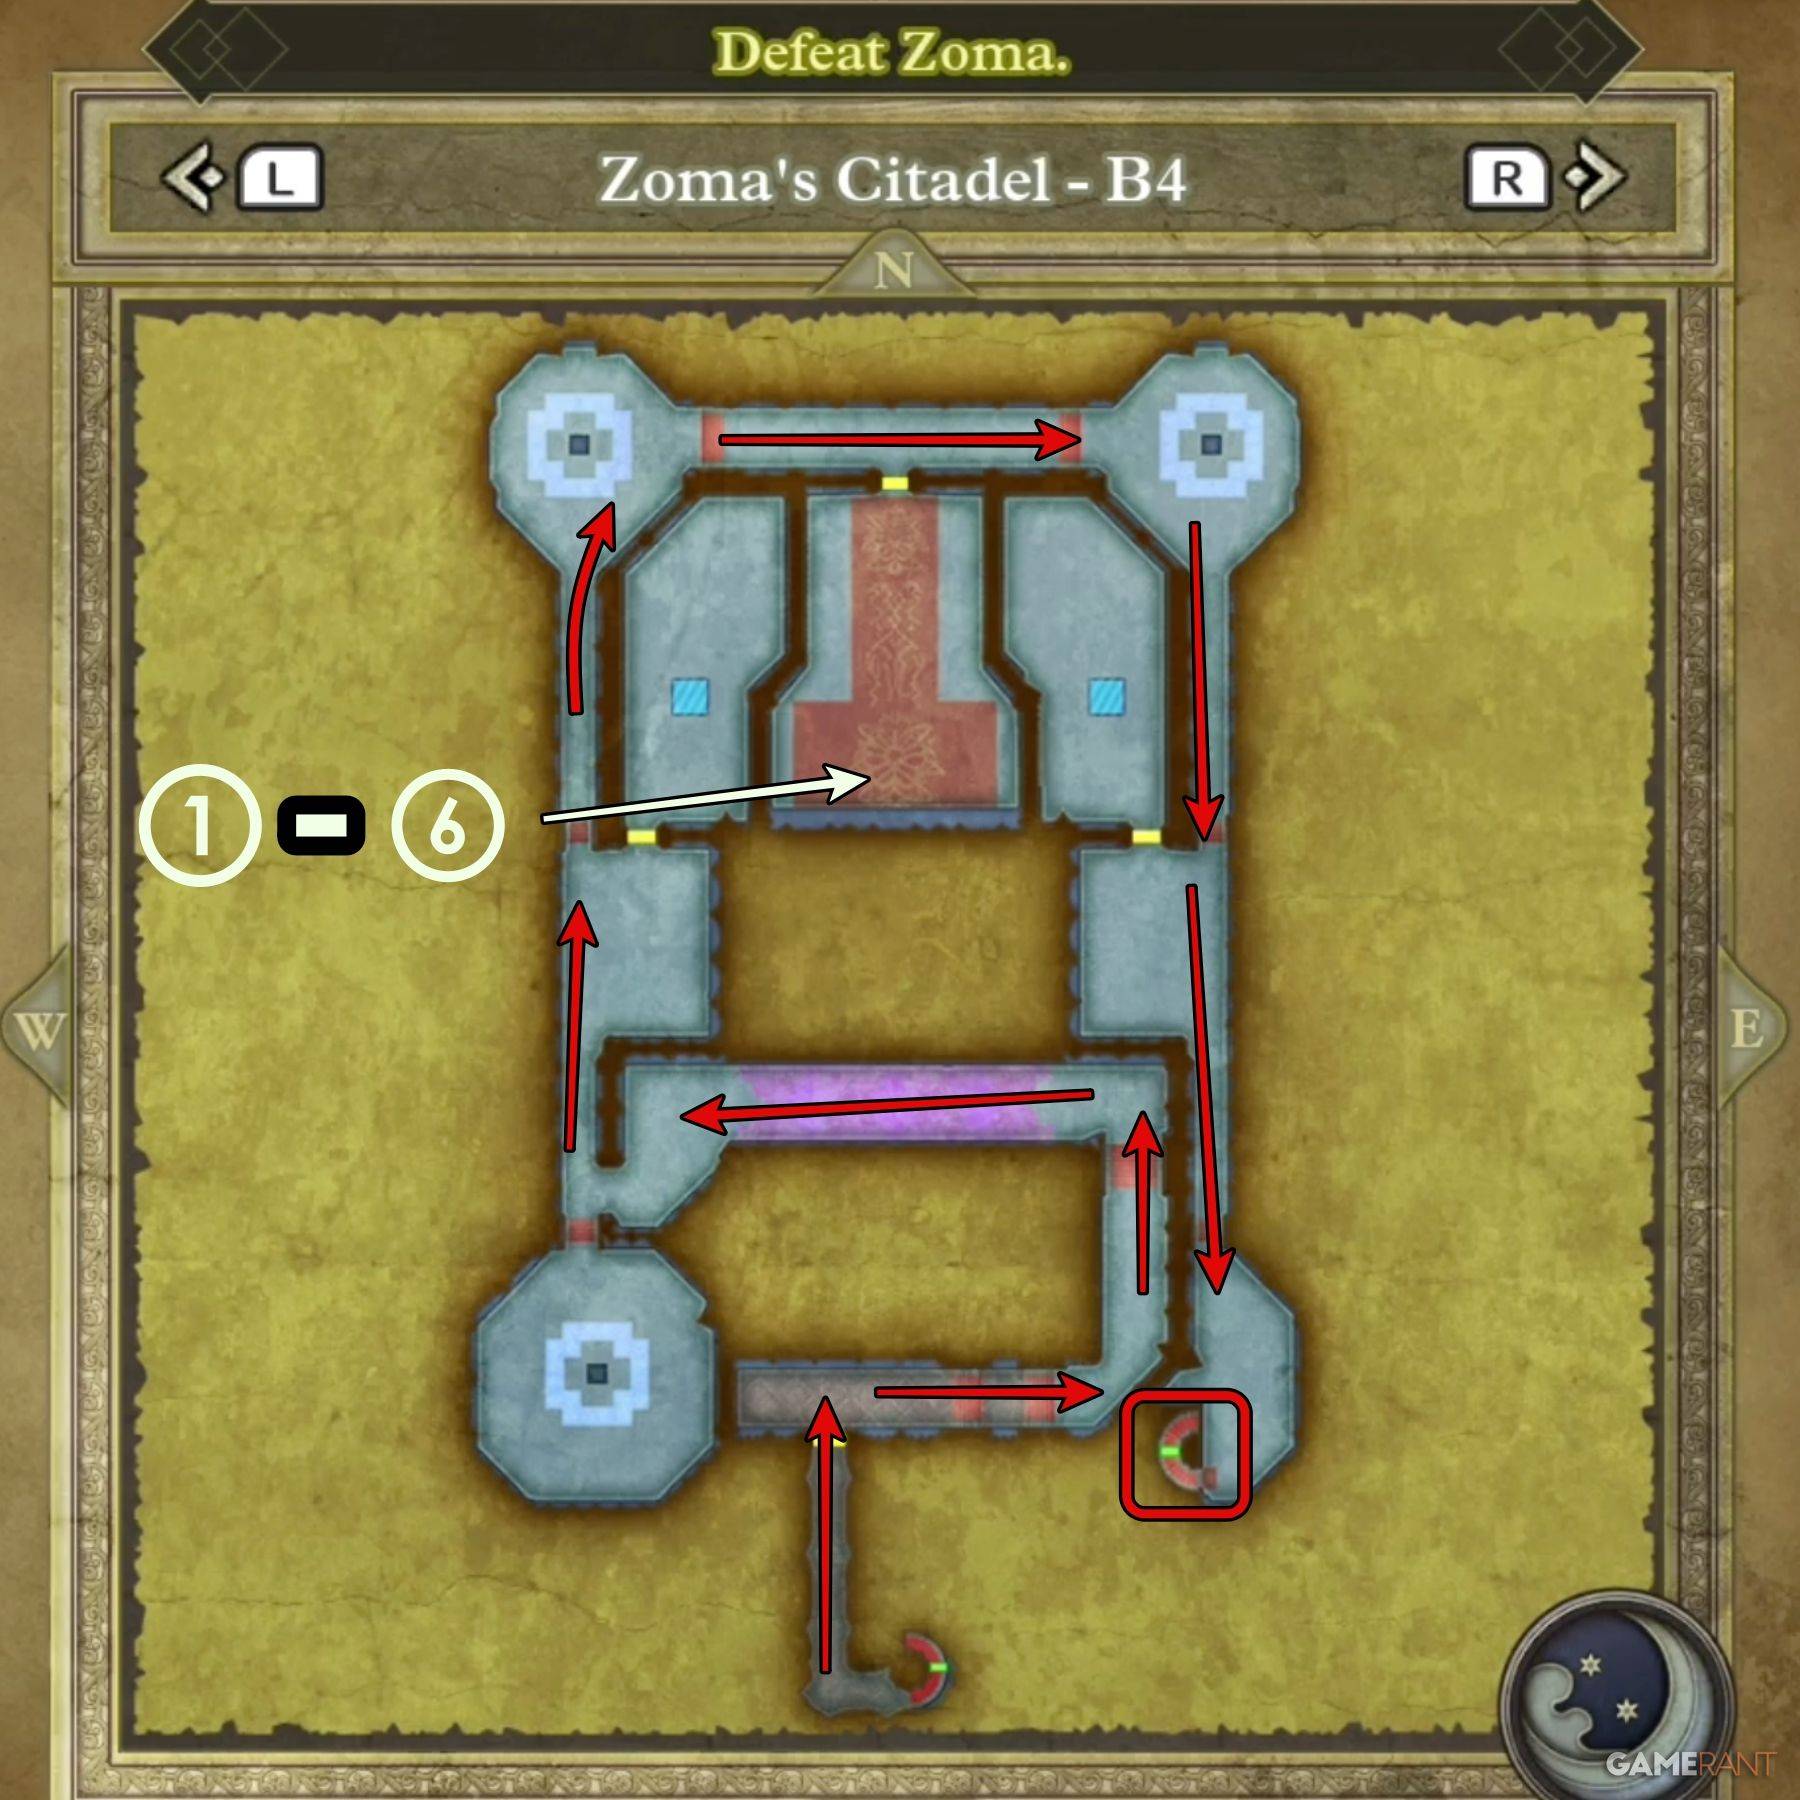
B4 is the final floor before Zoma. Navigate from the center-south, upwards, then to the southeast corner. A unique cutscene awaits upon entry.
B4 Treasure: (Six chests in one chamber, right to left)
- Treasure 1 (Chest): Shimmering Dress
- Treasure 2 (Chest): Prayer Ring
- Treasure 3 (Chest): Sage's Stone
- Treasure 4 (Chest): Yggdrasil Leaf
- Treasure 5 (Chest): Diamond
- Treasure 6 (Chest): Mini Medal
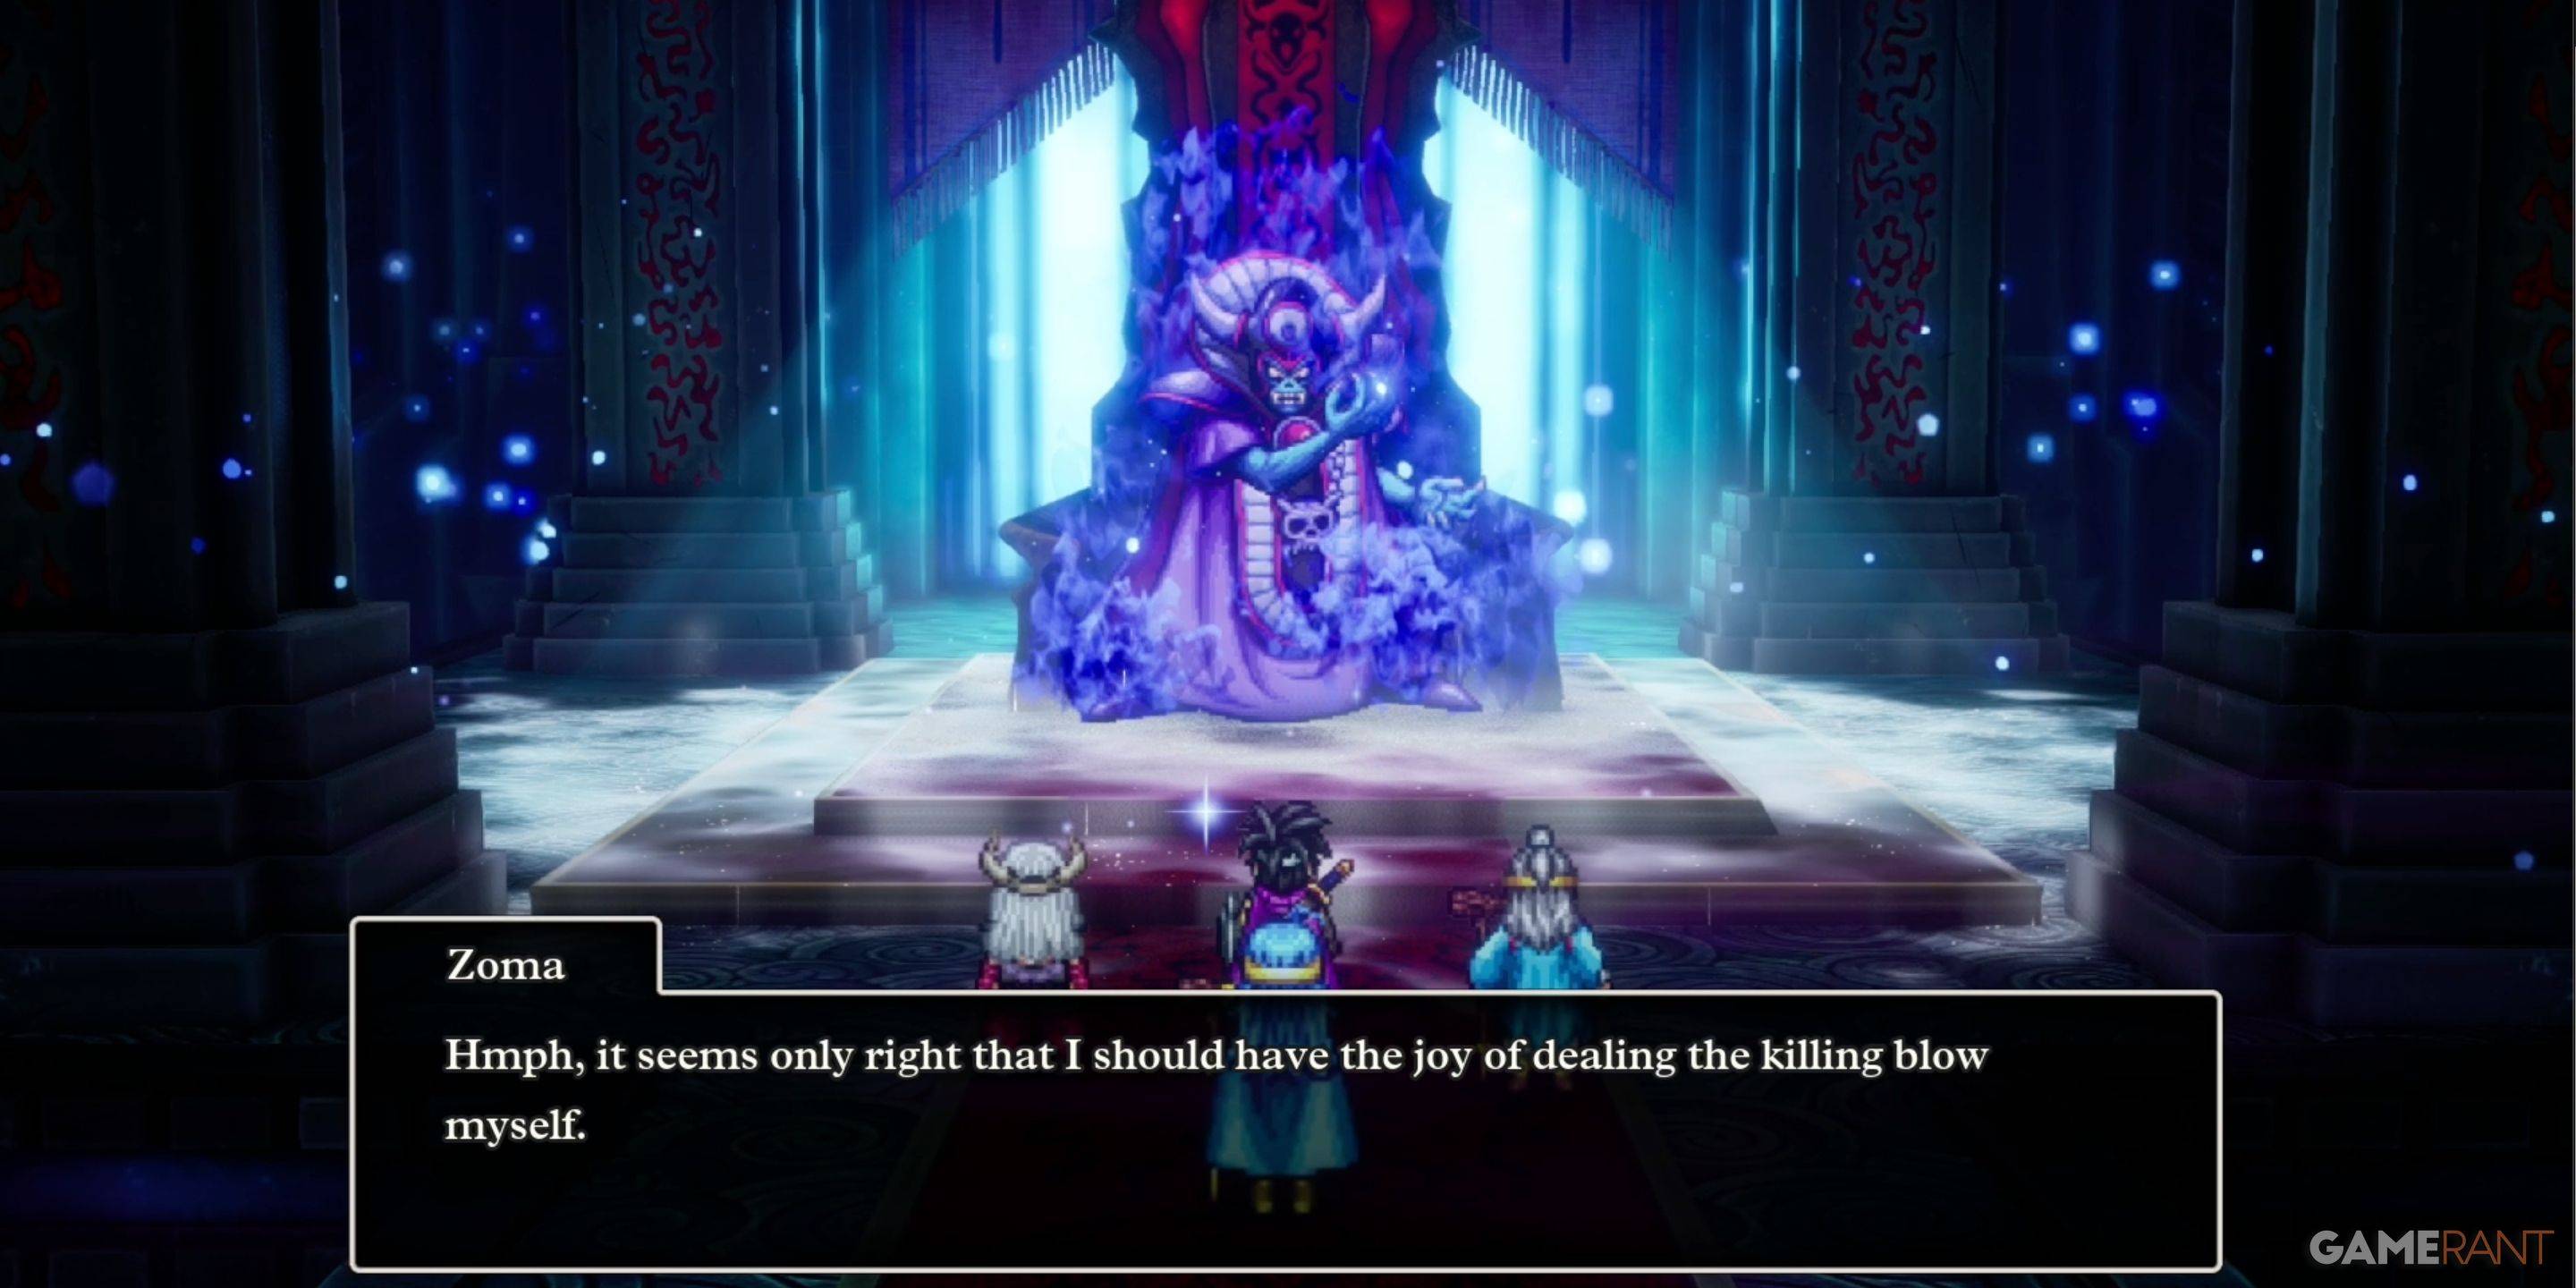
Defeating Zoma
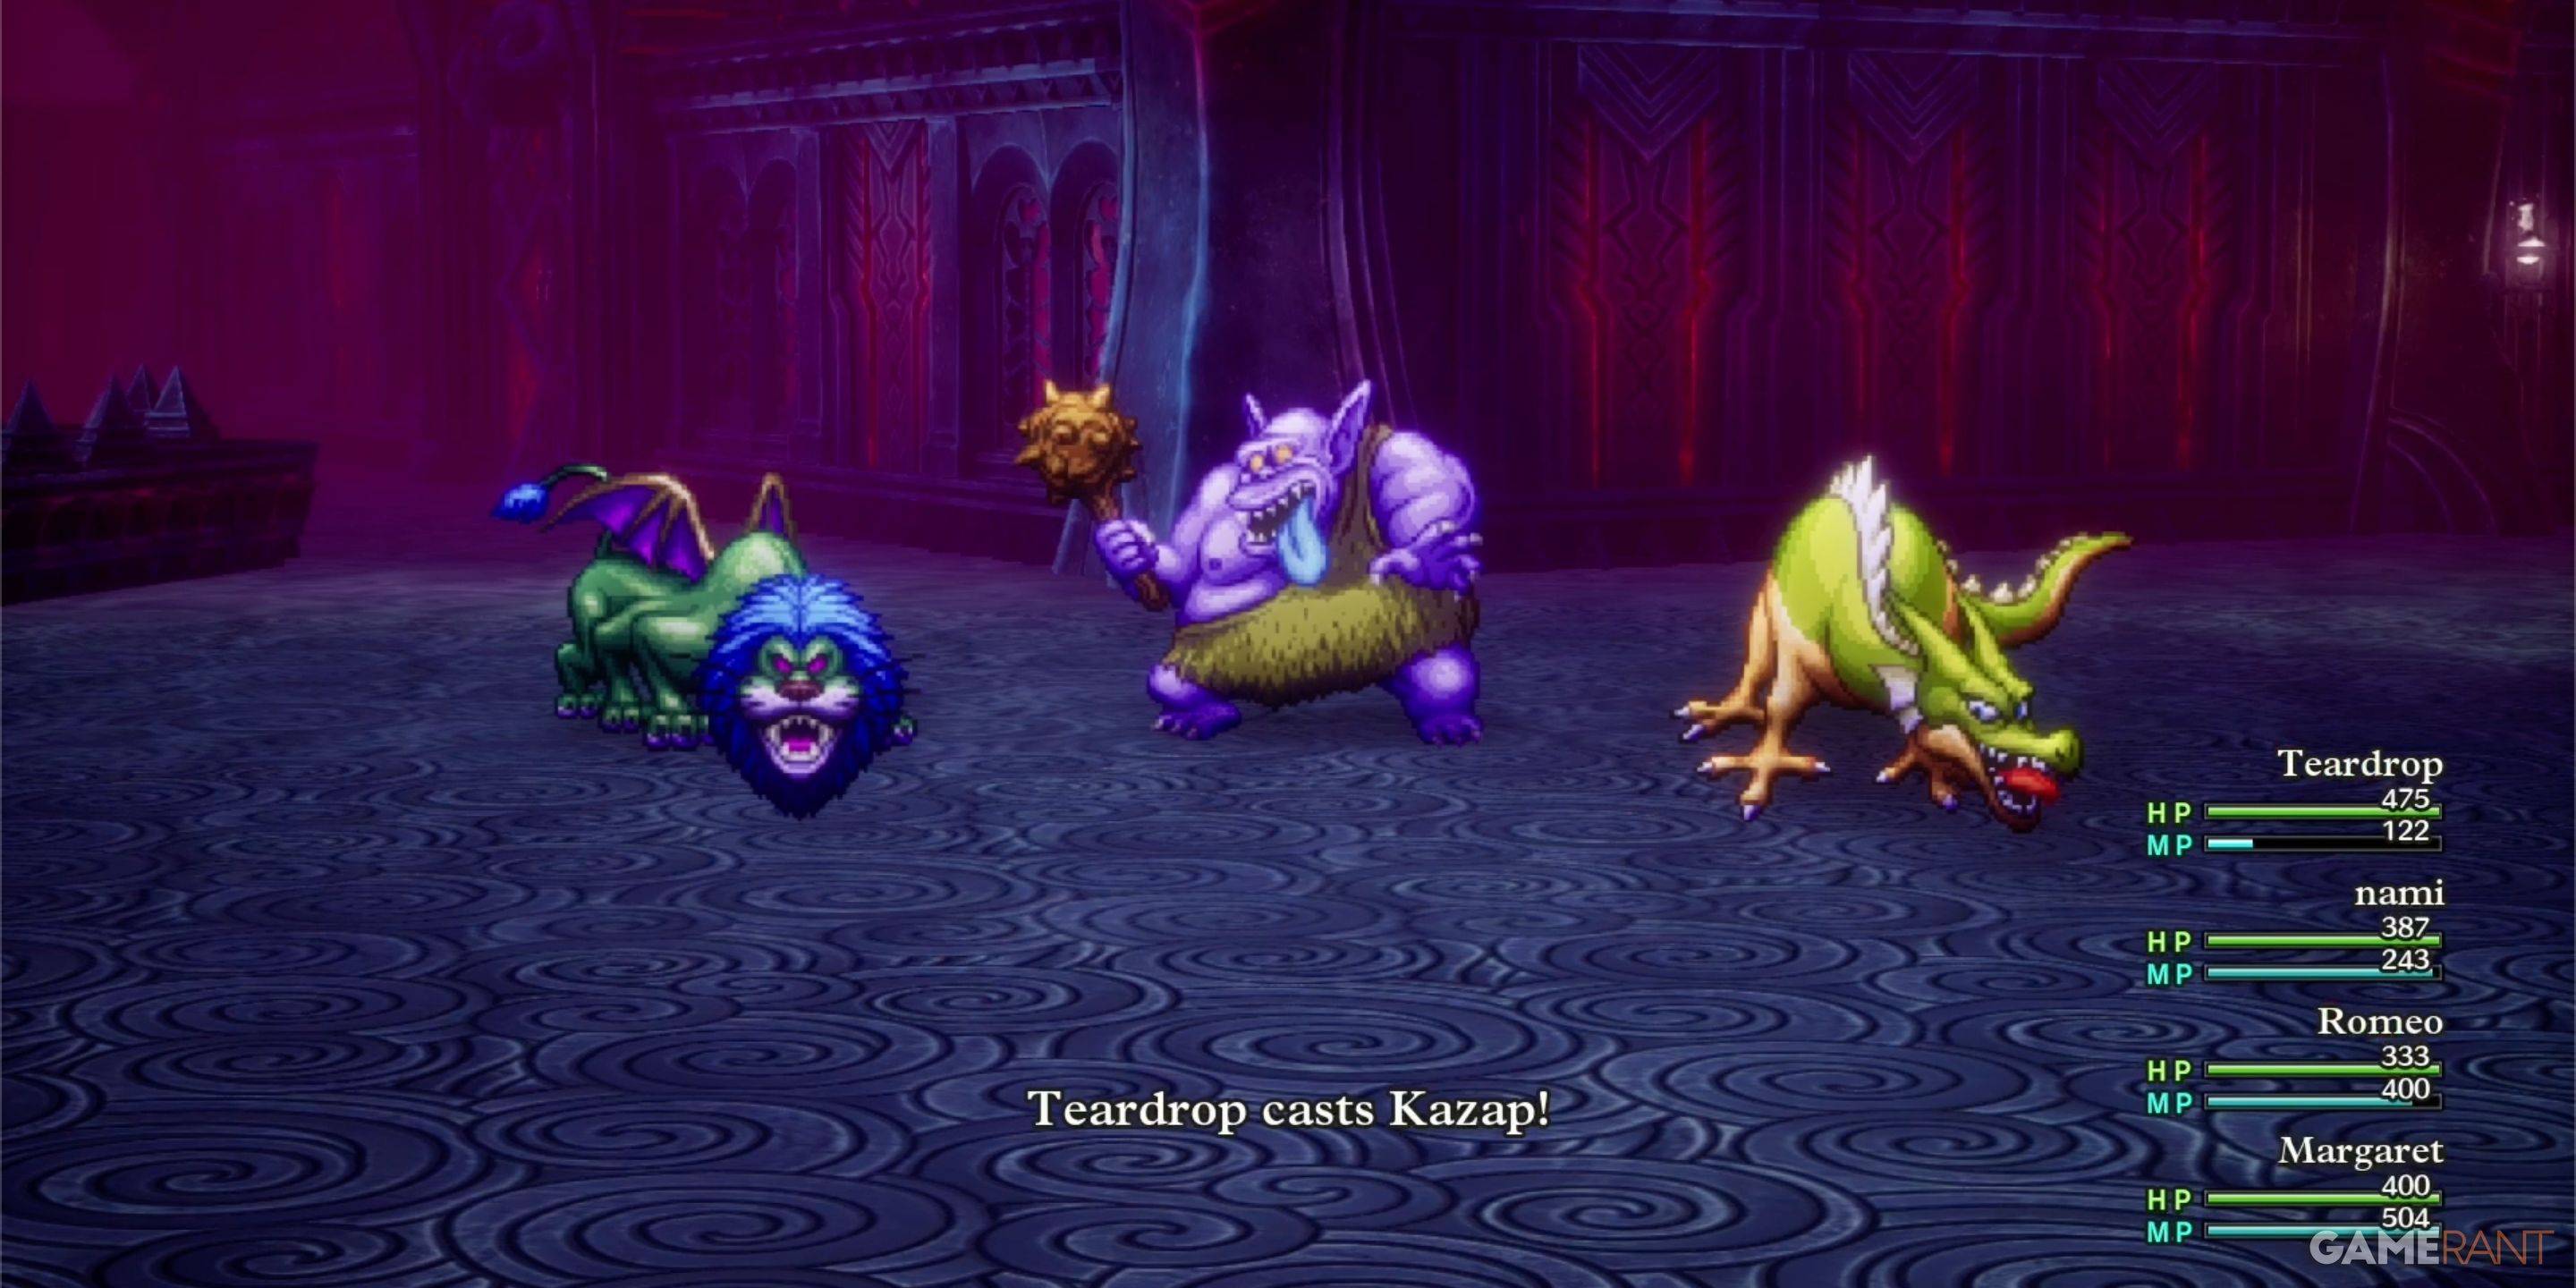
The final challenge involves a boss gauntlet: King Hydra, Soul of Baramos, and Bones of Baramos, before facing Zoma. Use items between fights.
- King Hydra: Vulnerable to Kazap. Aggressive strategy recommended.
- Soul of Baramos: Weak to Zap.
- Bones of Baramos: Similar weaknesses to the Soul.
Zoma's fight requires strategy. Initially, he has a magic barrier. Wait for the prompt to use the Sphere of Light, removing the barrier and making him vulnerable to Zap attacks (Kazap is highly effective). Prioritize HP and avoid over-aggression.
Zoma's Citadel Monsters
| Monster Name | Weakness |
|---|---|
| Dragon Zombie | None |
| Franticore | None |
| Great Troll | Zap |
| Green Dragon | None |
| Hocus-Poker | None |
| Hydra | None |
| Infernal Serpent | None |
| One-Man Army | Zap |
| Soaring Scourger | Zap |
| Troobloovoodoo | Zap |
This comprehensive guide should help you conquer Zoma's Citadel and complete Dragon Quest 3 Remake!
Latest Articles

Meow Rangers: Android Release for Idle RPG
Meow Rangers is a new idle rhythm action RPG now available on Android and iOS. This mobile autobattler takes place in a world invaded by sinister monsters, prompting a squad of musically gifted feline warriors to rise up and combat the evil forces.Ca
Charlie Cox Confirms Daredevil: Born Again Season 2 Filming Wraps
The future of Disney's Daredevil revival has become uncertain following a curious remark from series star Charlie Cox.Speaking at GalaxyCon, Cox referred to the upcoming second season of Daredevil: Born Again—scheduled for Disney+ in 2026—as the show
Sky: Children of the Light Celebrates the Lunar New Year 2025 with Days of Fortune
Sky: Children of the Light is launching the Days of Fortune event for 2025. Combining the wonder of the Lunar New Year with their annual tradition, Sky is ensuring this celebration remains as magnificent as ever.
This year’s festivities run from Janu

Crunchyroll Adds Elite Classroom Game to Catalog
Crunchyroll Game Vault introduces a thrilling new Android title: Classroom of the Elite, a mobile adaptation of Shōgo Kinugasa's acclaimed novel series. Mirroring the original storyline, players navigate intense classroom rivalries alongside academic

Fortnite debuts Blitz Royale for mobile: 32-player battles
Fortnite Introduces Mobile-Exclusive Blitz Royale ModeFortnite's latest mobile update brings an exciting new way to play with Blitz Royale mode. Following the game's return to EU devices via the Epic Games Store (and iOS in the US), this marks the fi
Marvel's Wonder Man Debuts in Disney+ Teaser
Disney+ unveiled exciting previews from its late 2025 lineup, showcasing both fresh series and returning favorites. Highlights include Marvel’s Wonder Man, the revived King of the Hill, the groundbreaking television debut of the Alien franchise with
Latest Games

Word Across
Word丨73.1 MB

Breaking The Friend Zone
Casual丨315.70M

Maya’s Mission
Casual丨64.57M


Cars Arena: Fast Race 3D Mod
Sports丨119.78M


โดมิโน่สยาม - Domino Siam
Card丨28.40M

888 Ladies
Puzzle丨4.70M
4 In A Line Adventure
Puzzle丨26.20M


Top News
MORE +


01
02-03
Roblox: Anime Adventures Codes (January 2025)
Anime Adventures Codes: A Comprehensive Guide to Free Gems and Rewards
This guide provides an up-to-date list of working and expired Anime Adventures codes in Roblox. Redeeming these codes grants valuable in-game gems and other rewards, giving you a head start in your adventure.
Updated January 5,
02
05-26
Enhance Your MU Immortal Experience with BlueStacks Features
MU Immortal captures the essence of classic MMORPG gameplay that fans adore—leveling up, enhancing stats, and crafting your ideal character. Designed primarily for mobile, the game truly shines when played on a PC using BlueStacks, thanks to an array of tools that streamline and enhance your gaming
03
05-16
"Clair Obscur: Expedition 33 Hits 1 Million Sales in 3 Days"
Clair Obscur: Expedition 33 has taken the gaming world by storm, achieving a phenomenal opening weekend by selling over 1 million copies just three days after its launch. This remarkable feat cements its status as the highest player-rated game of early 2025. Dive deeper into the journey of this grou
04
04-21
Roblox Anime Genesis: January 2025 Codes
Dive into the thrilling world of Anime Genesis, a dynamic tower defense game on Roblox where you assemble a squad of your favorite anime characters to fend off menacing monsters. Whether you're tackling levels solo or teaming up with friends, you'll earn gems that you can use to summon new heroes, e
05
01-20
New DLC and Preorder for FANTASIAN
FANTASIAN Neo Dimension: DLC and Pre-order Information
While anticipation for extra content is high, a FANTASIAN Neo Dimension DLC or story expansion is unlikely. Mistwalker head Hironobu Sakaguchi has stated his preference against sequels, aiming for complete, self-contained gaming experiences.
Topics
More +