"Ultimate Demonology Gear Essentials Unveiled"
Author : Evelyn
May 13,2025
Identifying Ghosts in Demonology can quickly become a guessing game if you're not equipped with the right tools. To ensure you're always one step ahead, dive into our comprehensive **Demonology equipment guide** below, and eliminate the guesswork from your investigations.
How to Buy and Use Equipment in Demonology
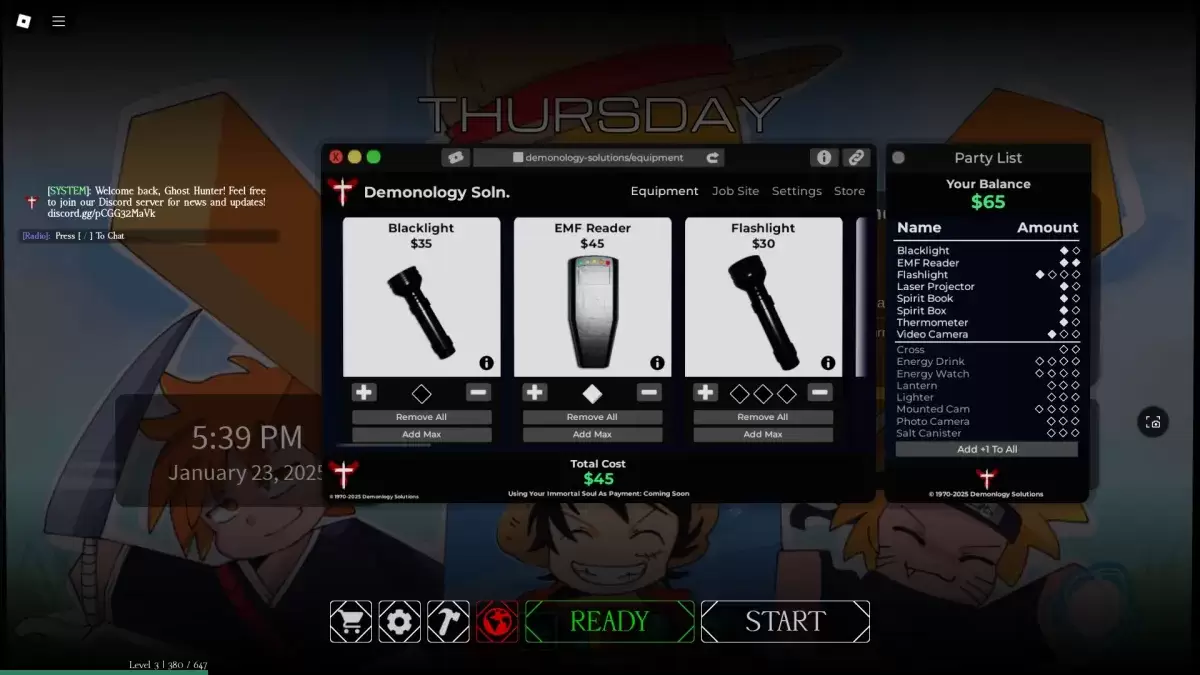 Equipment shop in the lobby
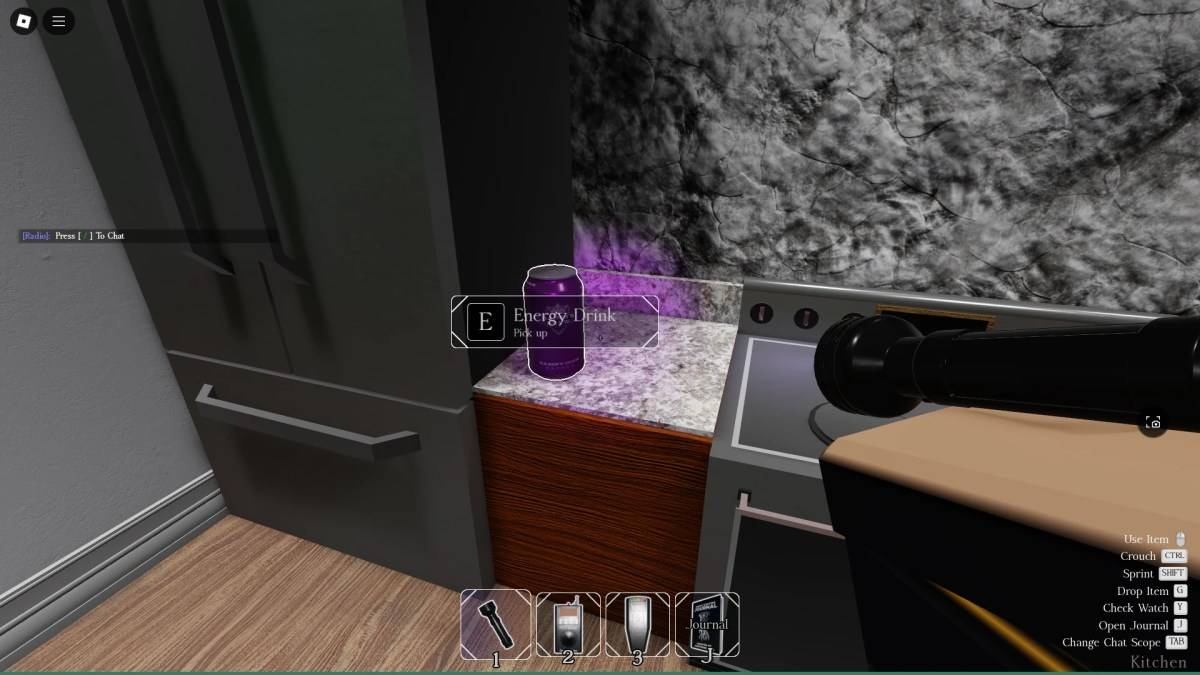 Energy Drink spawn in-game
Before embarking on a Demonology run, you have the opportunity to **purchase additional equipment** to aid your investigation. Remember, the **items** you buy are **available only for the next run**, so choose wisely. Additionally, some items may appear within the investigation areas themselves. You can carry a maximum of three items at once. To use your equipment, simply press the **RMB (M2)** button. If you need to drop an item, press the **G** key.
Evidence Equipment in Demonology
The cornerstone of ghost identification in Demonology is **evidence equipment**. These tools are vital for **gathering the evidence** necessary to pinpoint the exact type of Ghost you're facing. For a deeper dive into ghost identification, refer to our dedicated guide. Additionally, evidence equipment can be used strategically to **entice Ghosts to manifest**, perfect for capturing those elusive photos.
| Item | Use | Party limit | Price |
|---|---|---|---|
| **Blacklight** | • Activate the Blacklight and scan for any fingerprints, handprints, or footprints left behind by the Ghost. | 2 | $35 |
| **EMF Reader** | • Turn on the EMF Reader and move around to detect the Ghost's presence. It lights up and beeps loudly when it senses activity. You can also throw it on the ground to use as a stationary scanner. | 2 | $45 |
| **Laser Projector** | • Switch on the Laser Projector and place it down. It emits beams of light that can highlight any Ghost moving within its range. | 2 | $65 |
| **Spirit Book** | • Leave the Spirit Book on the ground. If a Ghost that interacts with Spirit Books is nearby, it may pick it up and write in it. | 2 | $40 |
| **Spirit Box** | • Use the Spirit Box to engage in dialogue with nearby Ghosts. Be prepared for them to ignore some of your prompts. | 2 | $50 |
| **Thermometer** | • Check the temperature with the Thermometer. Normal room temperatures range from 15-19 degrees; any significant deviation might indicate a Ghost's presence. | 2 | $30 |
| **Video Camera** | • Enter camera mode with the Video Camera to spot Ghost Orbs. You can also place it down and monitor it via the PC at the spawn point. | 3 | $50 |
Optional Equipment in Demonology
Optional equipment in Demonology is designed to enhance your survival and help you achieve secondary mission objectives. Keep in mind there's a limit on how many items your party can bring into each run.
| Item | Use | Party limit | Price |
|---|---|---|---|
| Flashlight | • Illuminate your surroundings with the Flashlight's cone of light. | 4 | $30 |
| Cross | • Use the Cross to ward off a Ghost during a hunt. | 2 | $30 |
| Energy Drink | • Consume the Energy Drink to replenish your Energy. | 4 | $30 |
| Energy Watch | • Check your remaining Energy with the Energy Watch. | 4 | $50 |
| Lantern | • Carry the Lantern to prevent your Energy from draining passively. | 3 | $15 |
| Lighter | • Use the Lighter to ignite the Lantern, candles, or simply as a light source. | 3 | $10 |
| Mounted Cam | • Similar to the Video Camera, but can be used alongside other items. Monitor it via the PC near the spawn point. | 4 | $50 |
| Photo Camera | • Capture images of Ghosts and other objects with the Photo Camera, aiding in completing optional objectives. | 3 | $40 |
| Salt Canister | • Create lines of Salt to deter some Ghosts and secure handprint evidence. | 3 | $15 |
That's all you need to know about using equipment effectively in Demonology. For more insights and tips on Roblox games, make sure to explore our **Roblox guides section** at Escapist.
Latest Articles

Snowbreak adds Vidya - Celestial Swan in Fragments of Truth update
Expand your team with Vidya - Celestial SwanDiscover new costumes and gameplay optionsExperience the enhanced Spectral Fantasies eventFollowing the Abyssal Dawn update, Seasun Games introduces "Fragments of Truth" to Snowbreak: Containment Zone, brin

Worms-Style Ballistic Hero VNG Launches in Anime Universe
Ballistic Hero VNG offers a fresh take on the classic Worms-style formula.Annihilate your enemies (or friends) with a vast arsenal of outrageous weapons.Unlock exciting new loadouts and limited-edition skins, or design your own unique fighter.When it
Fortnite's Top Female Character Skins
Fortnite, Epic Games' groundbreaking battle royale, has captured massive appeal not just for its exciting gameplay but also for its constantly expanding assortment of character outfits. Female skins, in particular, are celebrated for their fashionabl
Firefighting Sim Emergency Call 112 Launches on Android
Emergency Call 112 – The Attack Squad arrives today on Android. Published by Aerosoft and developed by Crenetic, this game plunges you into the life of a firefighter. It was first released for PC in December 2023.What Are the Features?In the mobile e
Stellar Blade Creator Posts Record Year, PC Sales to Top PS5
Shift Up, the developer behind Stellar Blade, has achieved record-breaking financial success with its recent action RPG. The PlayStation 5 exclusive generated an impressive $43 million in royalties, while projections indicate the upcoming PC version
Nonogram Puzzle Game Marks 10 Years on Mobile
Ten years ago, Picture Cross launched as World’s Biggest Picture Cross, designed to be the ultimate nonogram experience on mobile. Today, with more than 10,000 puzzles, Picture Cross is marking its 10th anniversary with fresh modes and even more chal
Latest Games


QuizOn- All GK Trivia Quiz App
Trivia丨19.9 MB

Cricket World Champions
Sports丨98.7 MB

Quiz For SW Fans
Trivia丨3.9 MB

Türk Daması Online
Card丨4.50M

Yari
Role Playing丨43.6 MB
Legends of Heropolis
Simulation丨63.7 MB


Top News
MORE +

01
02-03
Roblox: Anime Adventures Codes (January 2025)
Anime Adventures Codes: A Comprehensive Guide to Free Gems and Rewards
This guide provides an up-to-date list of working and expired Anime Adventures codes in Roblox. Redeeming these codes grants valuable in-game gems and other rewards, giving you a head start in your adventure.
Updated January 5,
02
05-26
Enhance Your MU Immortal Experience with BlueStacks Features
MU Immortal captures the essence of classic MMORPG gameplay that fans adore—leveling up, enhancing stats, and crafting your ideal character. Designed primarily for mobile, the game truly shines when played on a PC using BlueStacks, thanks to an array of tools that streamline and enhance your gaming
03
05-16
"Clair Obscur: Expedition 33 Hits 1 Million Sales in 3 Days"
Clair Obscur: Expedition 33 has taken the gaming world by storm, achieving a phenomenal opening weekend by selling over 1 million copies just three days after its launch. This remarkable feat cements its status as the highest player-rated game of early 2025. Dive deeper into the journey of this grou
04
04-21
Roblox Anime Genesis: January 2025 Codes
Dive into the thrilling world of Anime Genesis, a dynamic tower defense game on Roblox where you assemble a squad of your favorite anime characters to fend off menacing monsters. Whether you're tackling levels solo or teaming up with friends, you'll earn gems that you can use to summon new heroes, e
05
01-20
New DLC and Preorder for FANTASIAN
FANTASIAN Neo Dimension: DLC and Pre-order Information
While anticipation for extra content is high, a FANTASIAN Neo Dimension DLC or story expansion is unlikely. Mistwalker head Hironobu Sakaguchi has stated his preference against sequels, aiming for complete, self-contained gaming experiences.
Topics
More +