Dragon Quest 3 Remake: Baramos\'s Lair Walkthrough
Author : Oliver
Feb 20,2025
Conquer Baramos's Lair in Dragon Quest 3 Remake: A Comprehensive Guide
After securing the Six Orbs and hatching Ramia the Everbird, you're ready to challenge Baramos's Lair in Dragon Quest 3 Remake. This formidable dungeon serves as the ultimate test before venturing into the game's underworld. This guide navigates you through locating, exploring, and conquering Baramos's Lair.
Baramos's Lair houses the Archfiend Baramos, the primary antagonist of the game's first half. Access is granted only after obtaining Ramia. Aim for a party level of at least 20 before attempting this challenge. The dungeon holds valuable items, detailed in the sections below.
Reaching Baramos's Lair
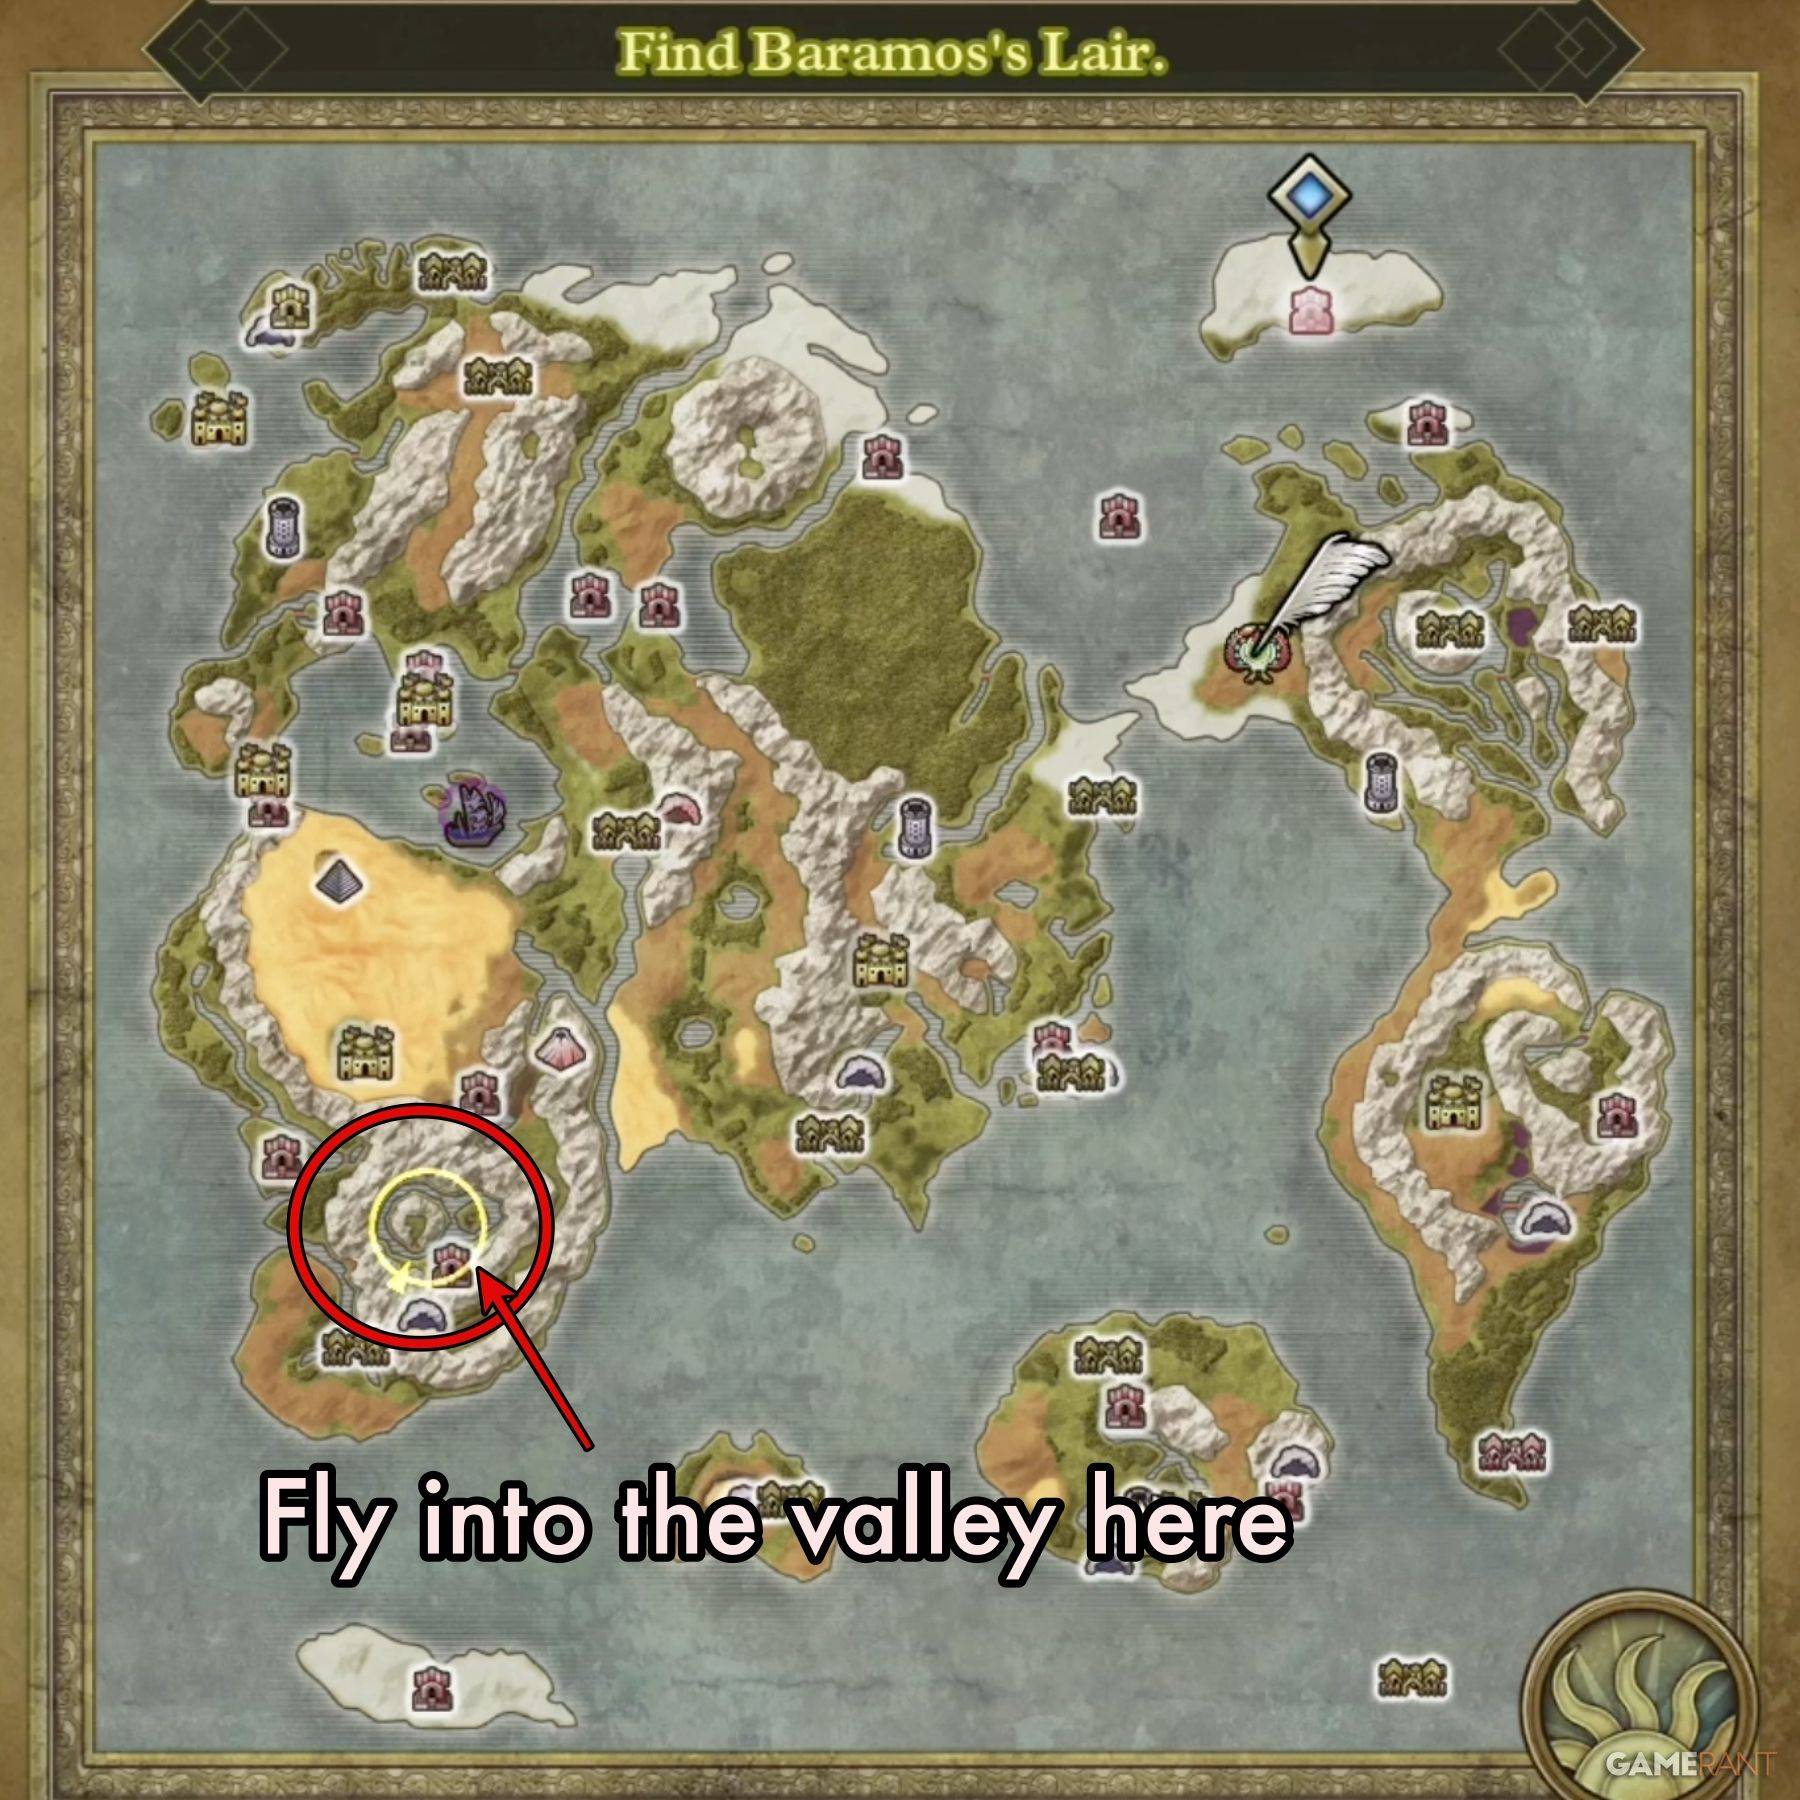
Following the Maw of the Necrogond and acquisition of the Silver Orb, unlock the Everbird. Fly from either the Shrine of the Everbird or Necrogond Shrine to an island nestled amidst mountains. This island marks Baramos's Lair's location. Ramia will transport you near the dungeon entrance. Proceed north to enter.
Navigating Baramos's Lair
Baramos's Lair deviates from typical dungeon structures. Instead of linear progression, it involves traversing indoor and outdoor areas to reach Baramos. The main outdoor area, "Surroundings," serves as a central hub. The following outlines the path to the final boss encounter, with treasure locations detailed separately.
Main Path to Baramos:
- Upon entering from the overworld, bypass the main entrance. Instead, circumnavigate the castle's eastern side toward the northeastern pool.
- Ascend the stairs to the pool, then turn left (west) to another stair set. Proceed upward and locate a door to the right. Enter.
- You're now in the Eastern Tower. Ascend to the top and exit.
- Traverse the castle roof (visible on the Surroundings map) southwestward, then descend to the lower level. Continue west, passing through gaps in the northwestern double wall. Use the northwestern stair set.
- The stairs lead to the Central Tower. Proceed southwest, utilizing "Safe Passage" to cross electrified floor panels. Descend the stairs to B1 Passageway A.
- In B1 Passageway A, turn east and proceed to the easternmost stairs.
- Enter the South-East Tower. Head northeast to the stairs, ascend to the roof, then head west and descend again. Cross the grass northwest and enter the only available door.
- This door leads to the Central Tower's northeast corner. Exit via the single available path.
- You'll be in B1 Passageway B. Proceed north and ascend the stairs.
- You are in the Throne Room. Proceed south to the exit, avoiding floor panels.
- Back in the Surroundings area, locate the northeastern structure (on an island). This is Baramos's Den, where the boss awaits.
Baramos's Lair Treasure
Surroundings:
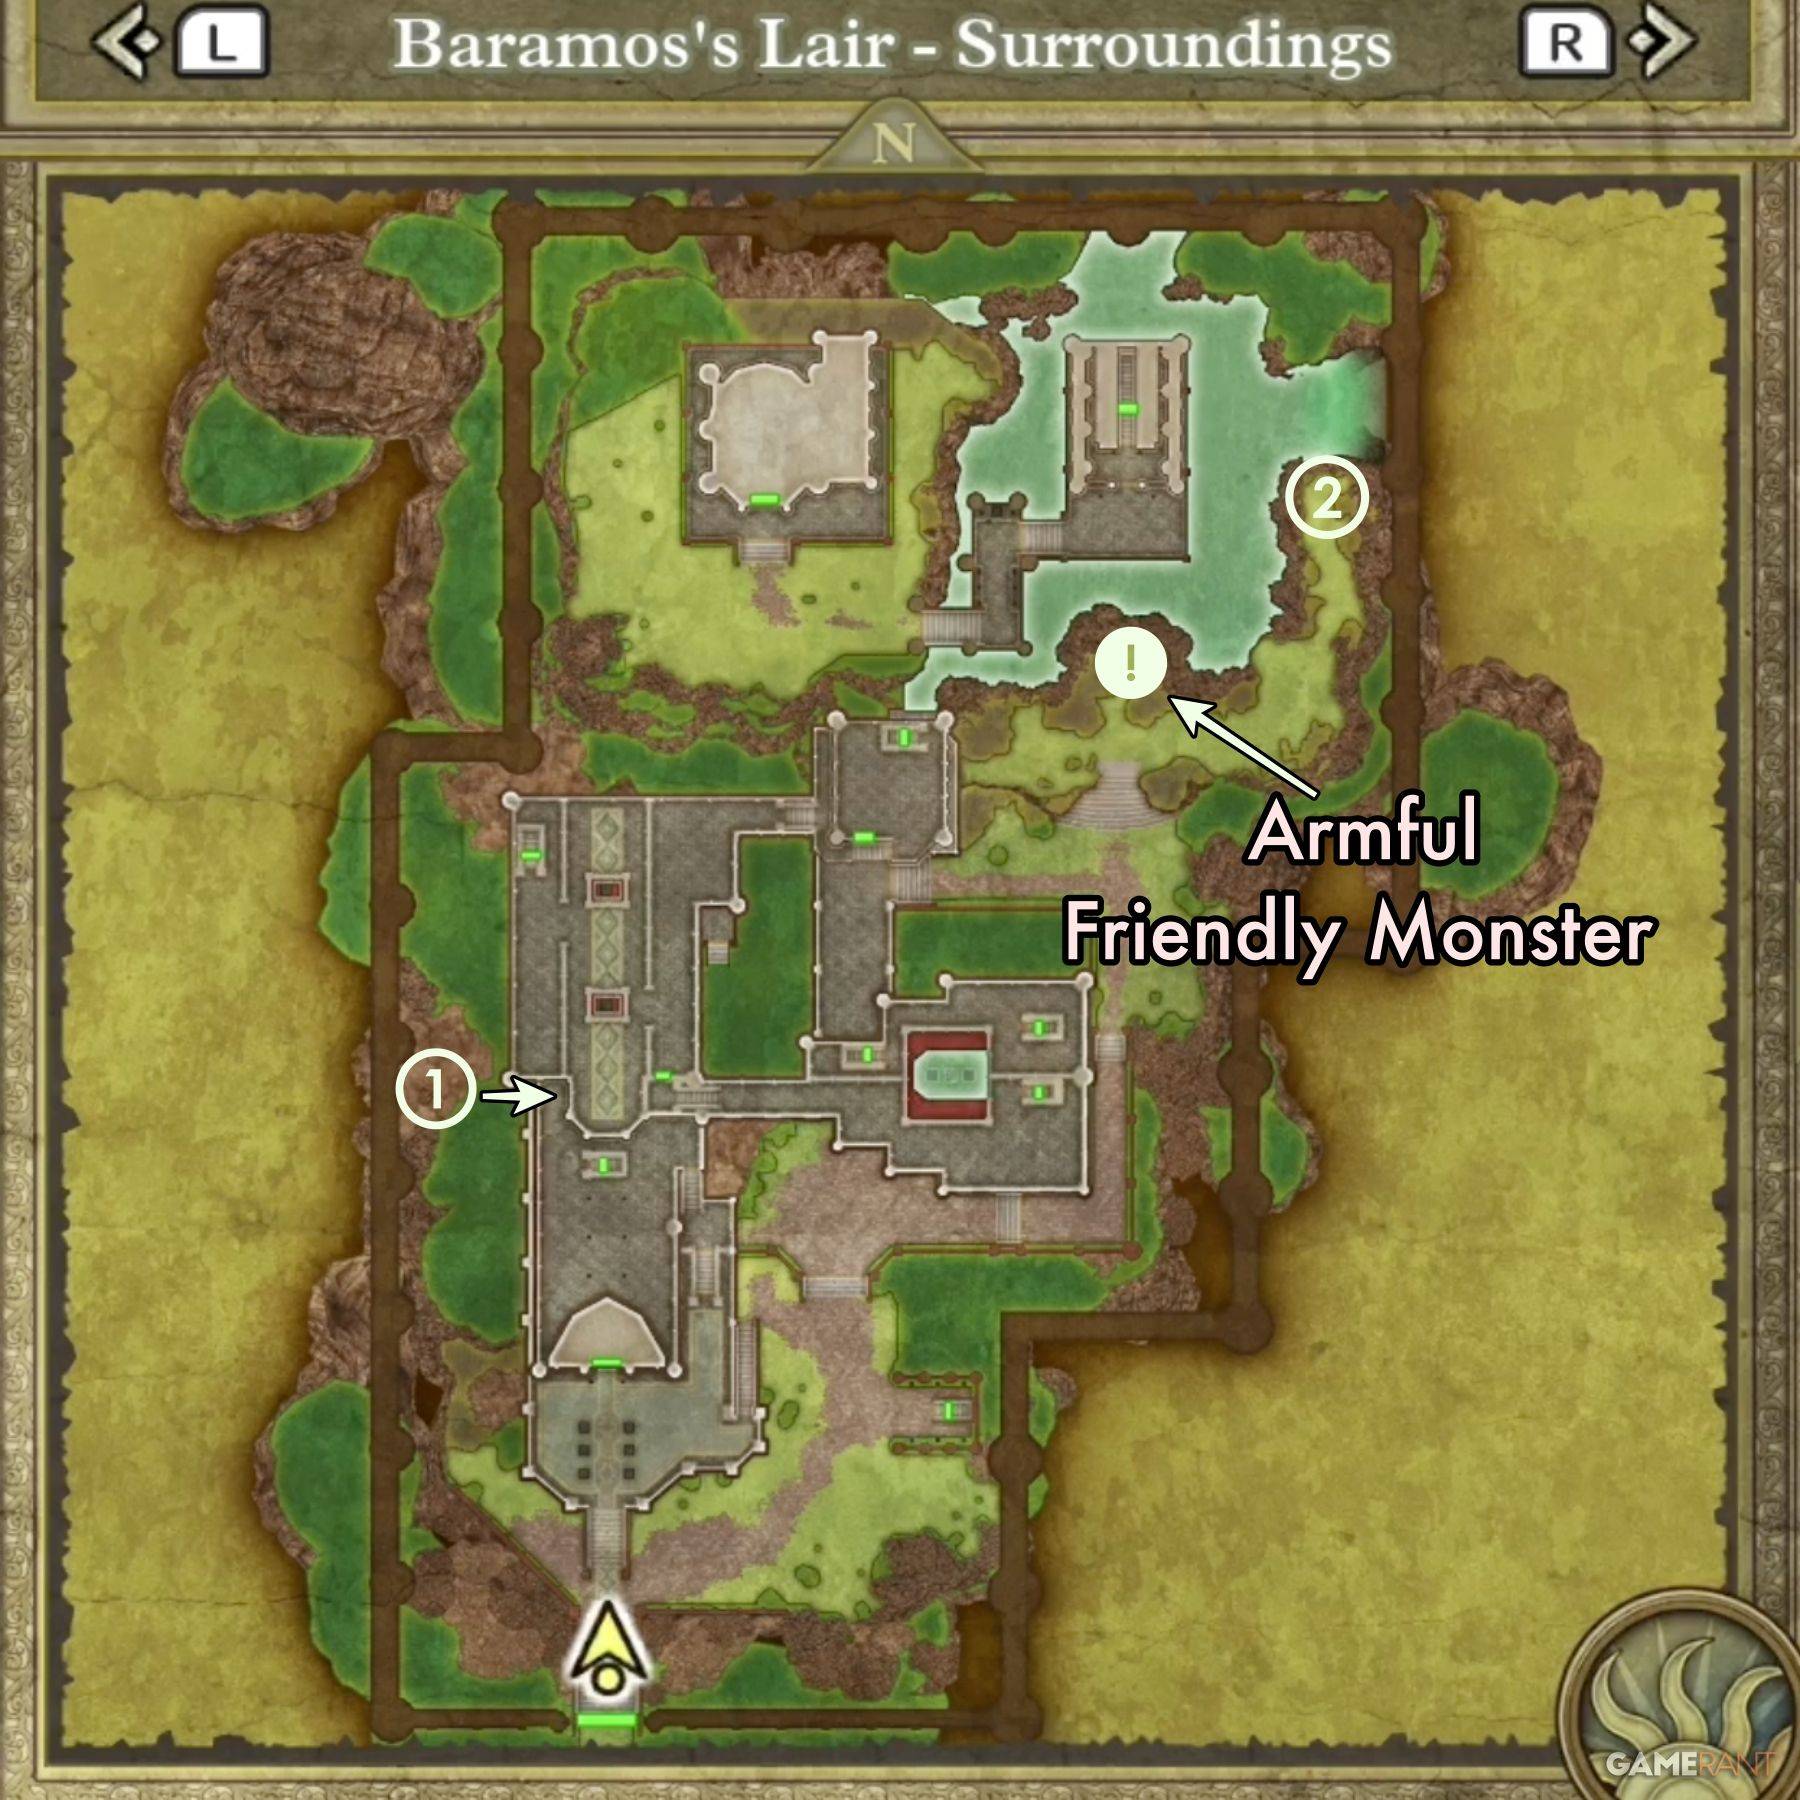
- Treasure 1 (Chest): Prayer Ring
- Treasure 2 (Buried): Flowing Dress
Central Tower:
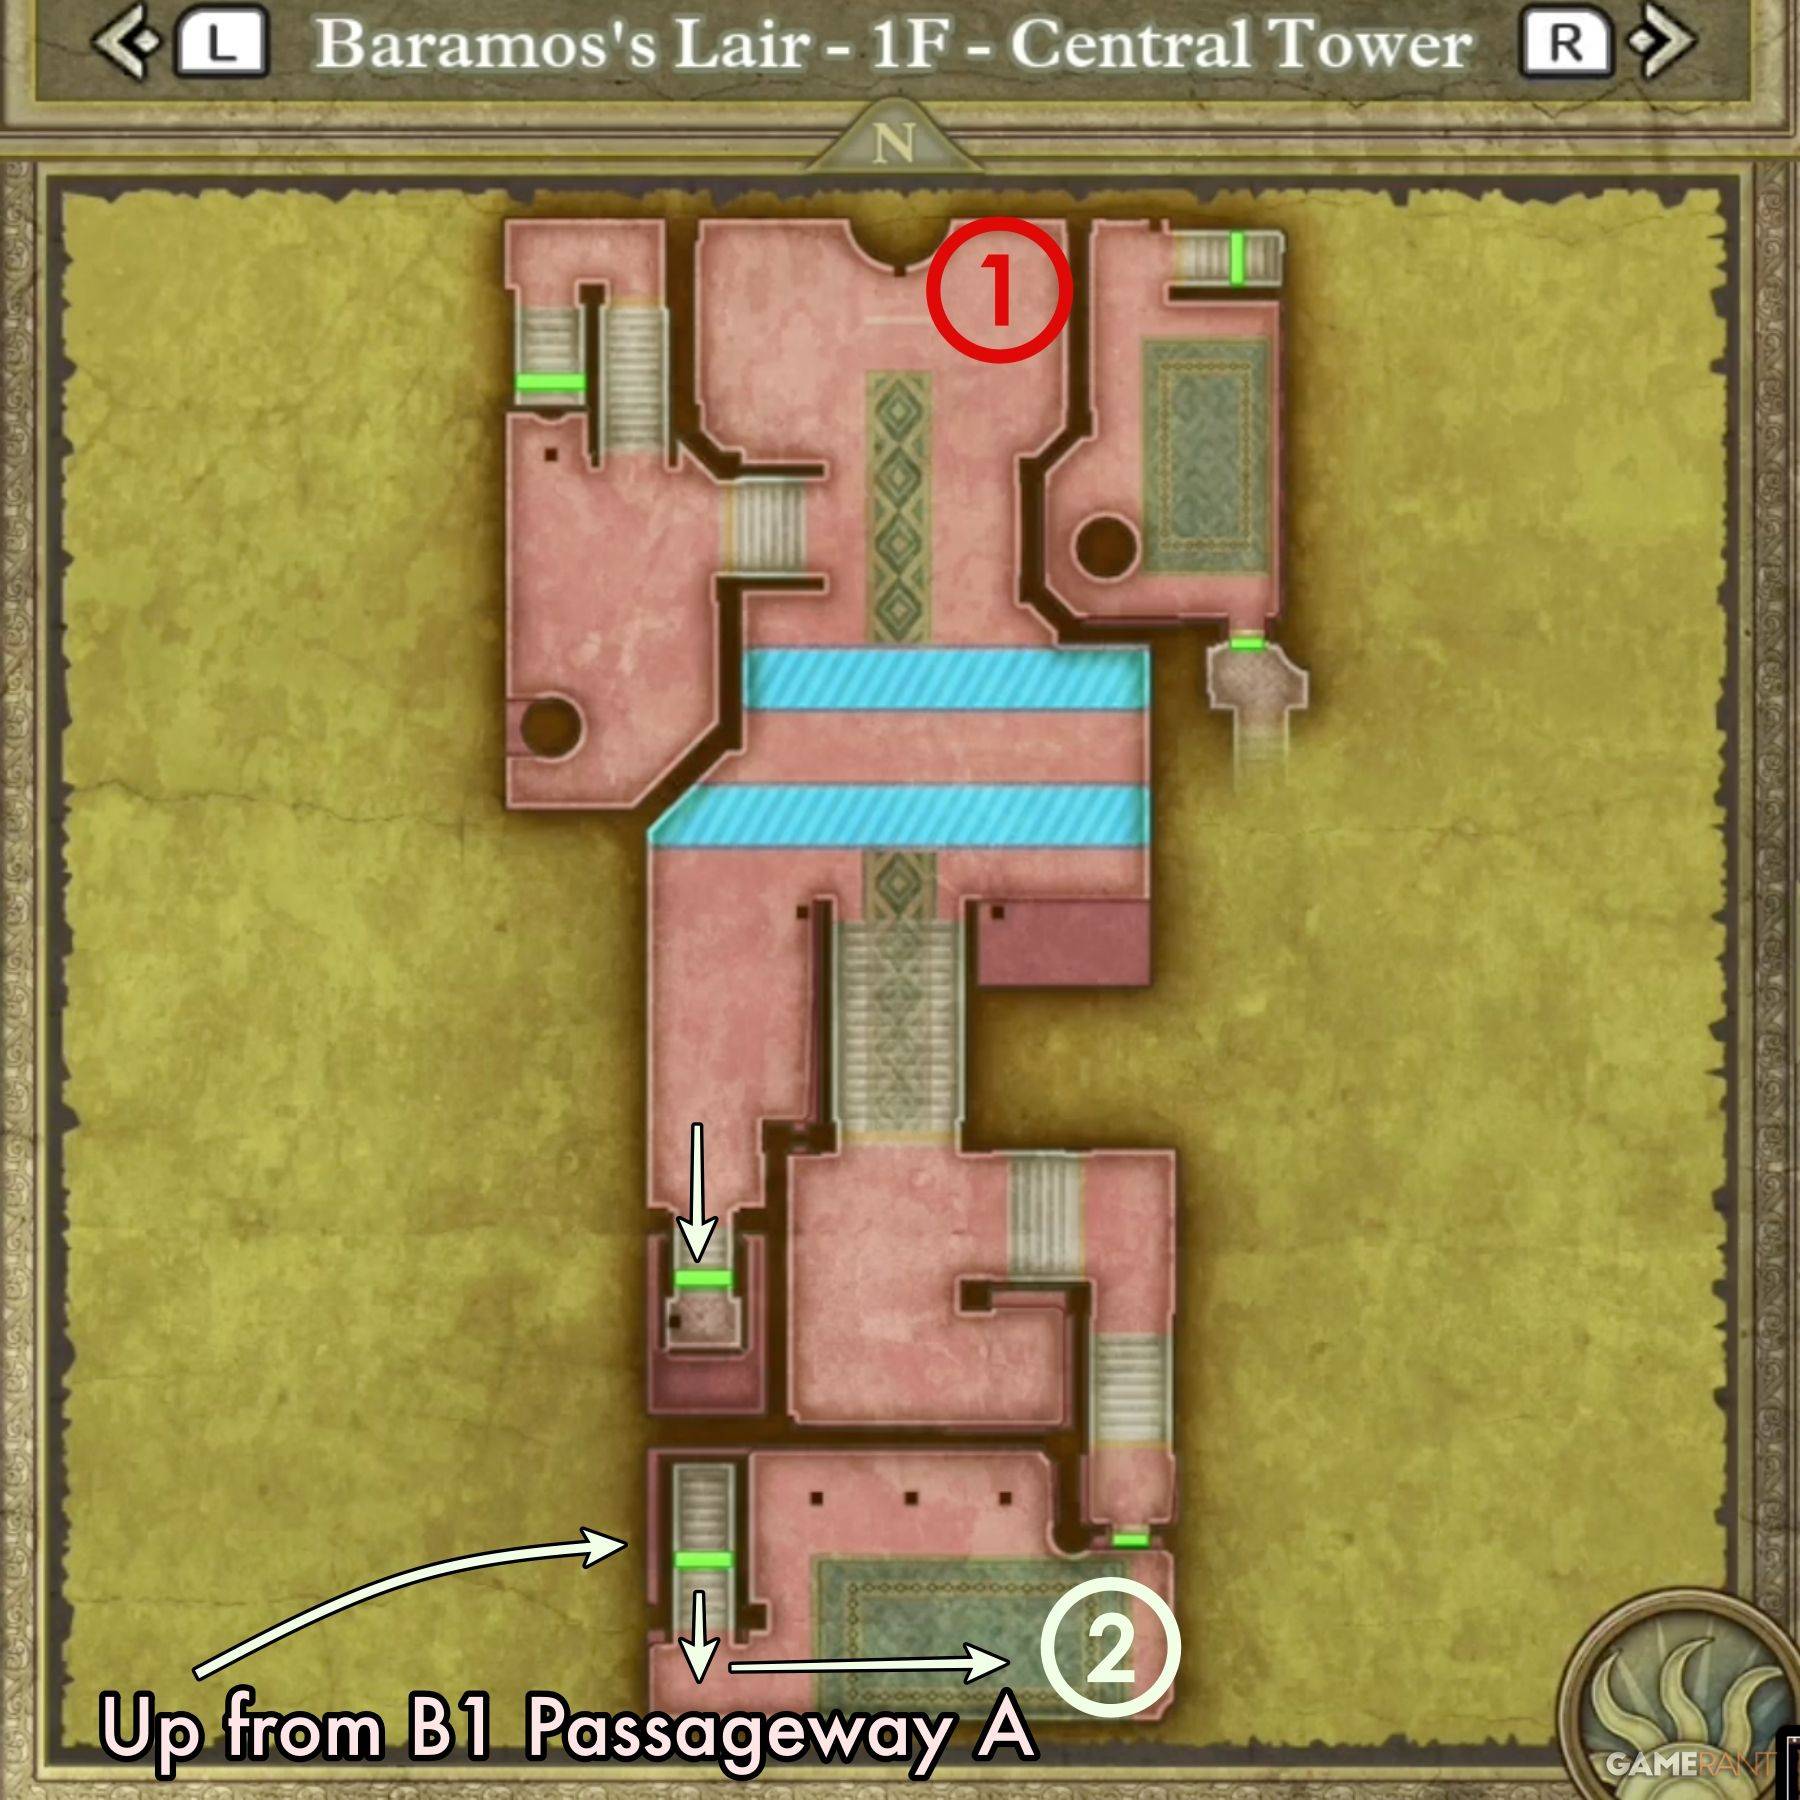
- Treasure 1: Mimic (enemy)
- Treasure 2: Dragon Mail
South-East Tower:
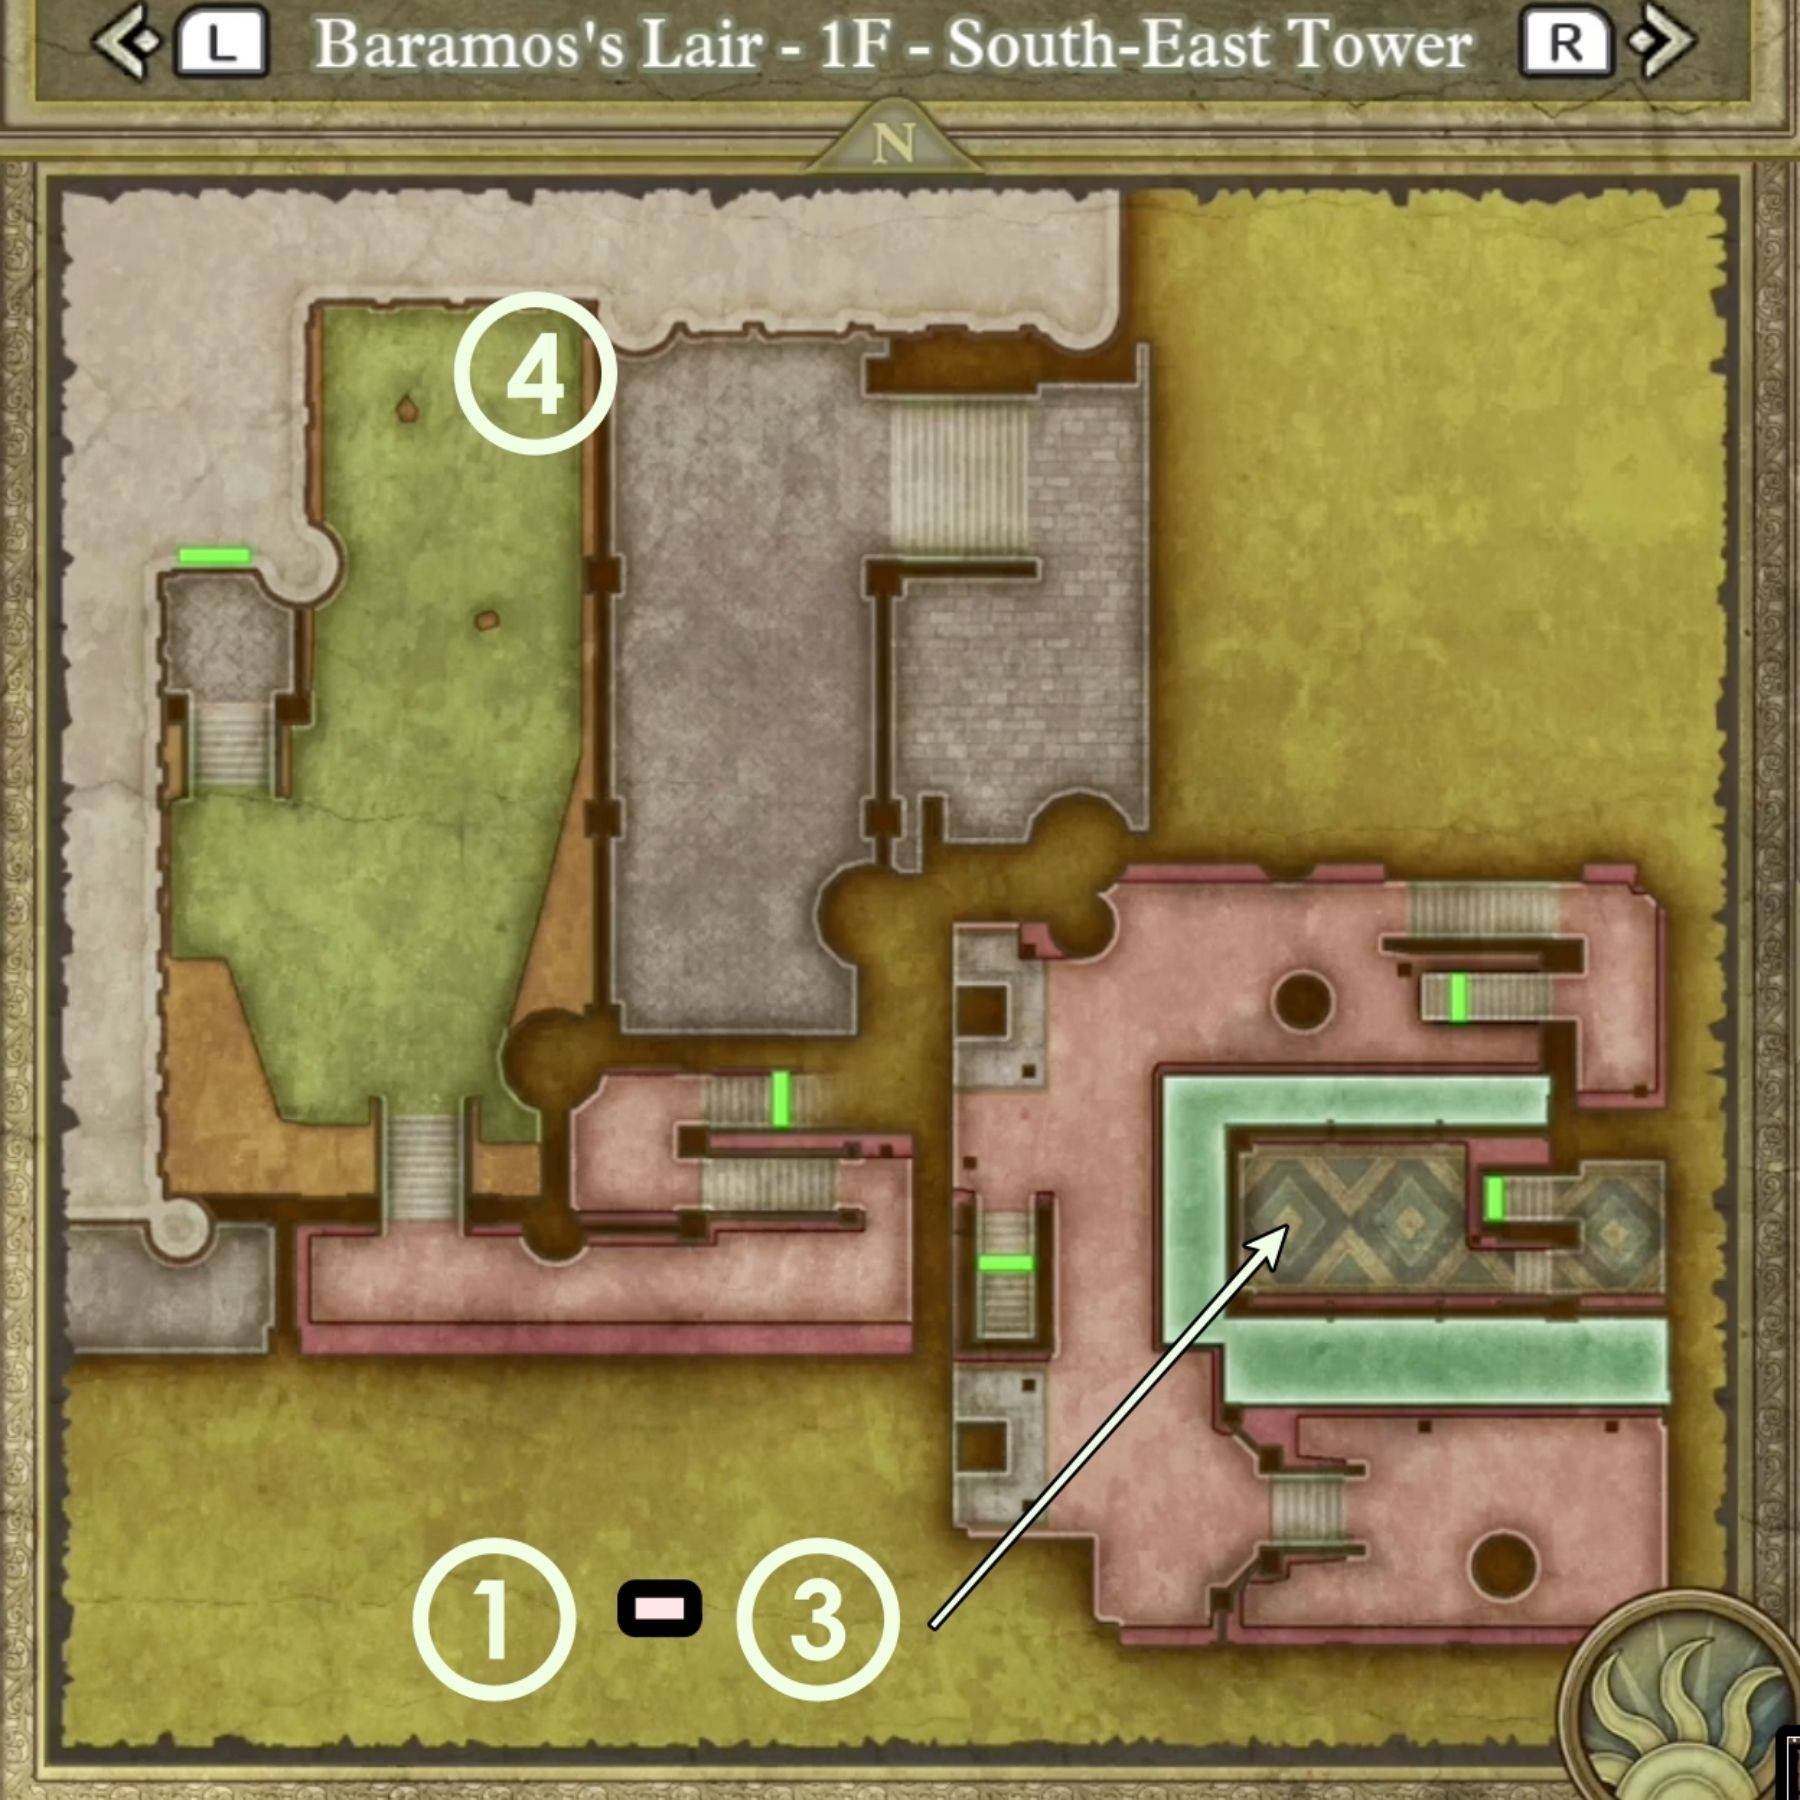
- Treasure 1 (Chest): Hapless Helm
- Treasure 2 (Chest): Sage's Elixir
- Treasure 3 (Chest): Headsman's Axe
- Treasure 4 (Chest): Zombiesbane
B1 Passageway:
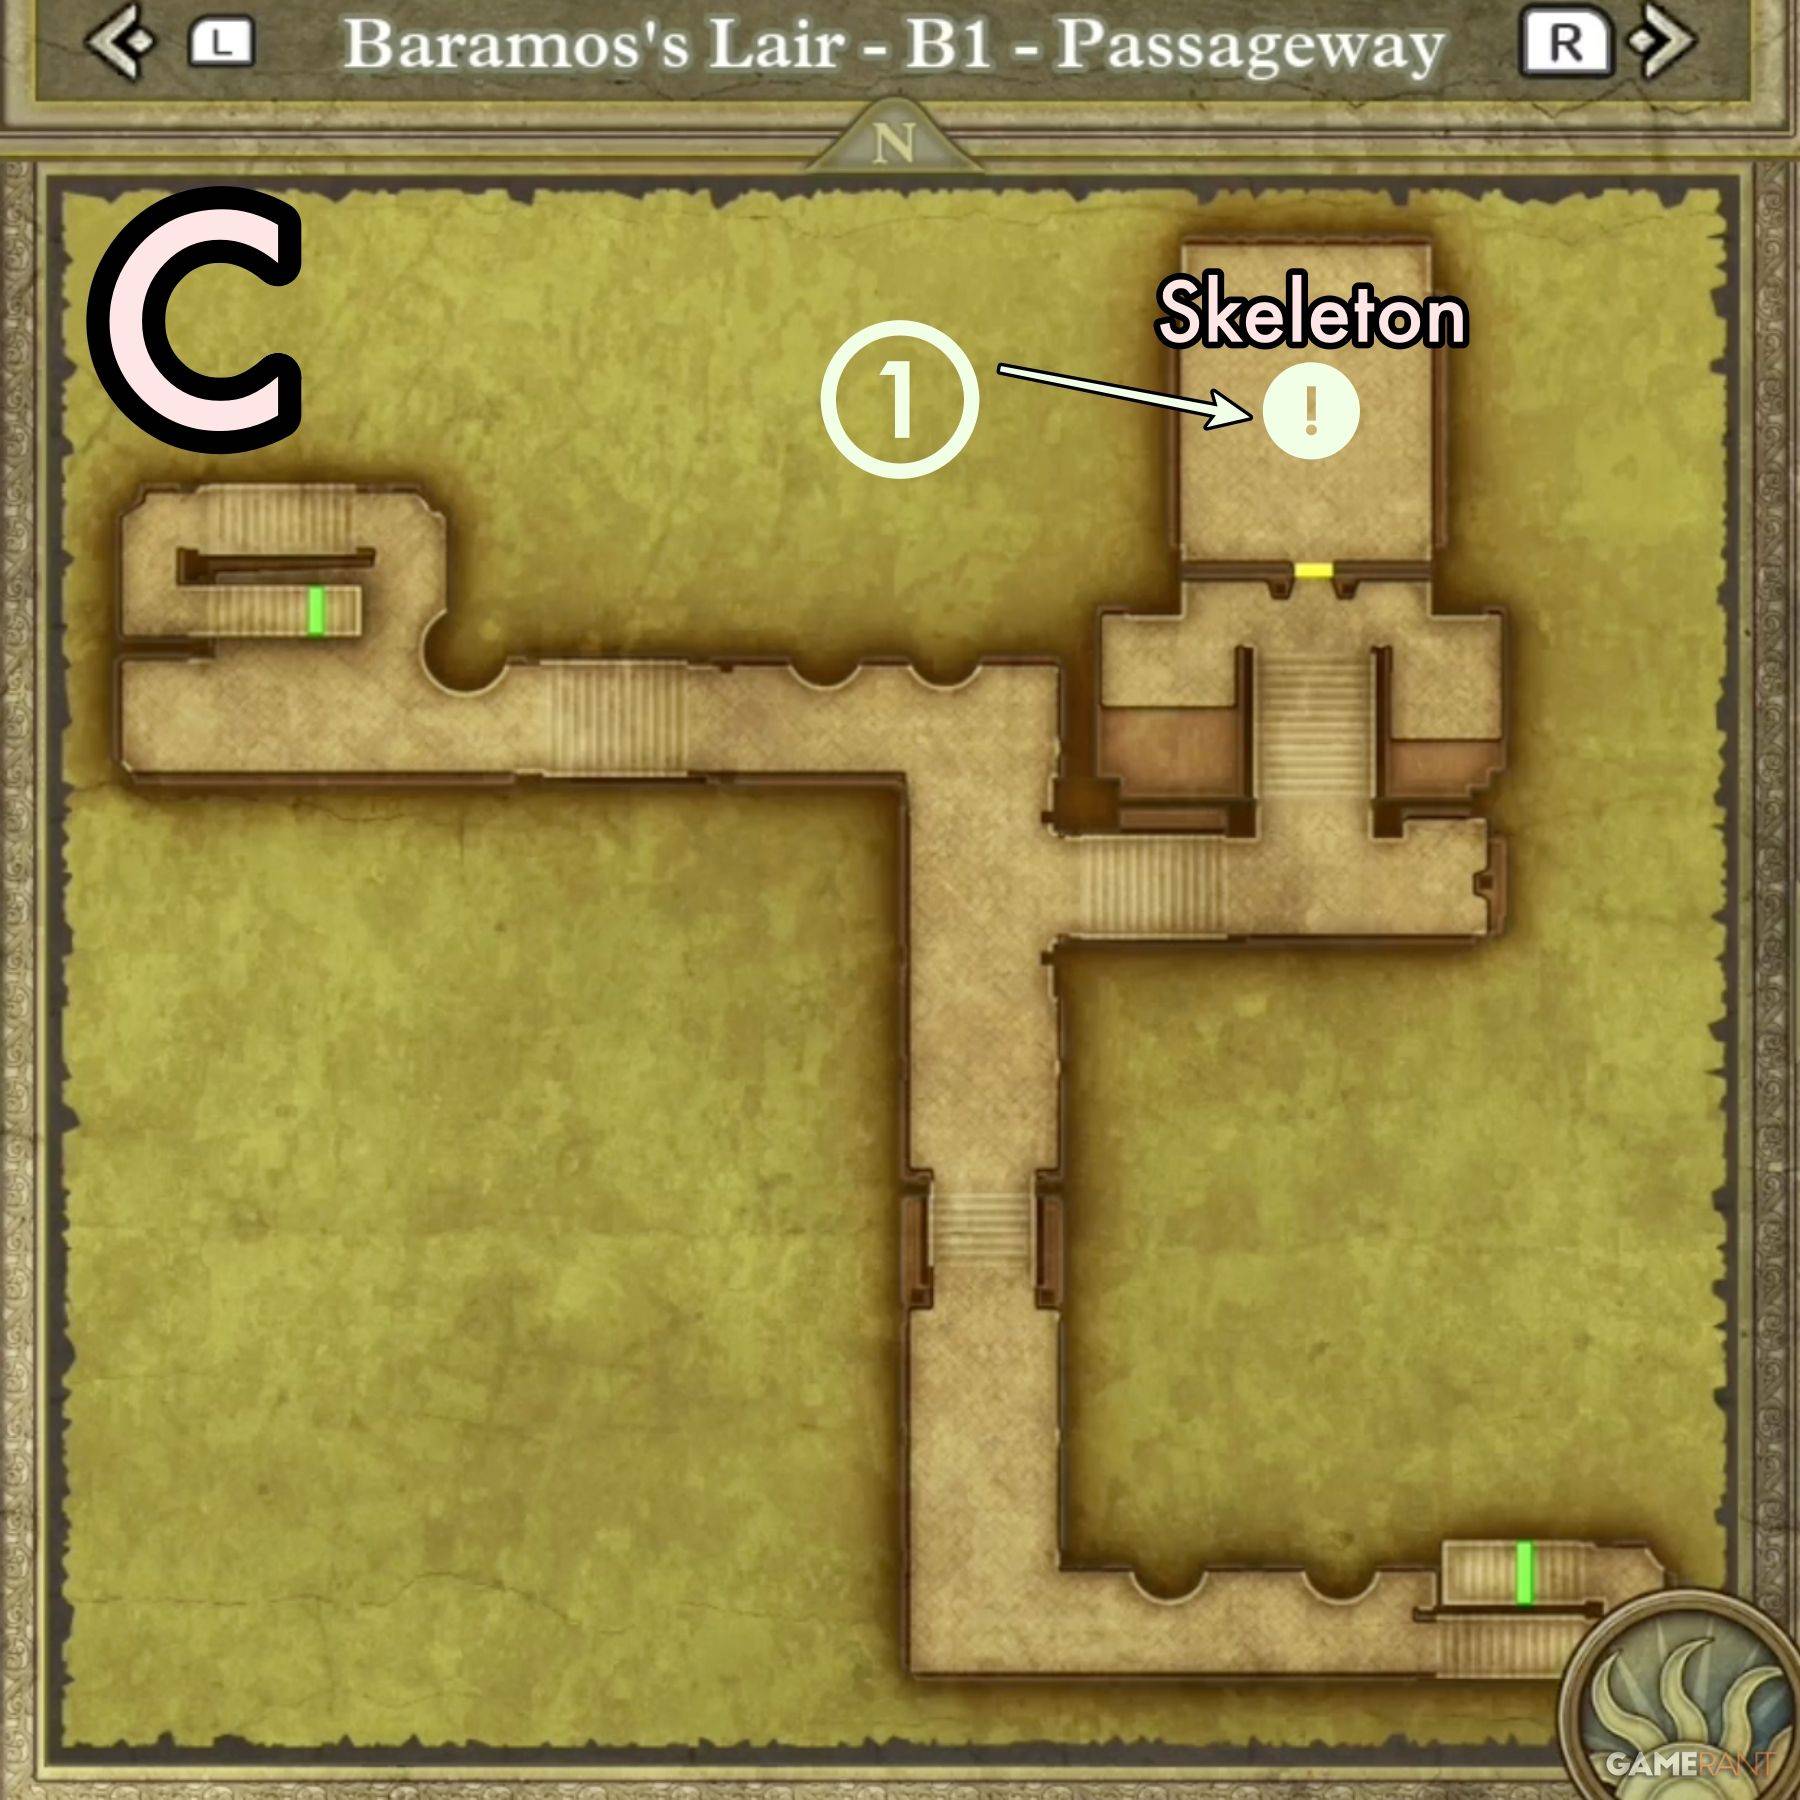
- Treasure 1 (Buried): Mini Medal
Throne Room:
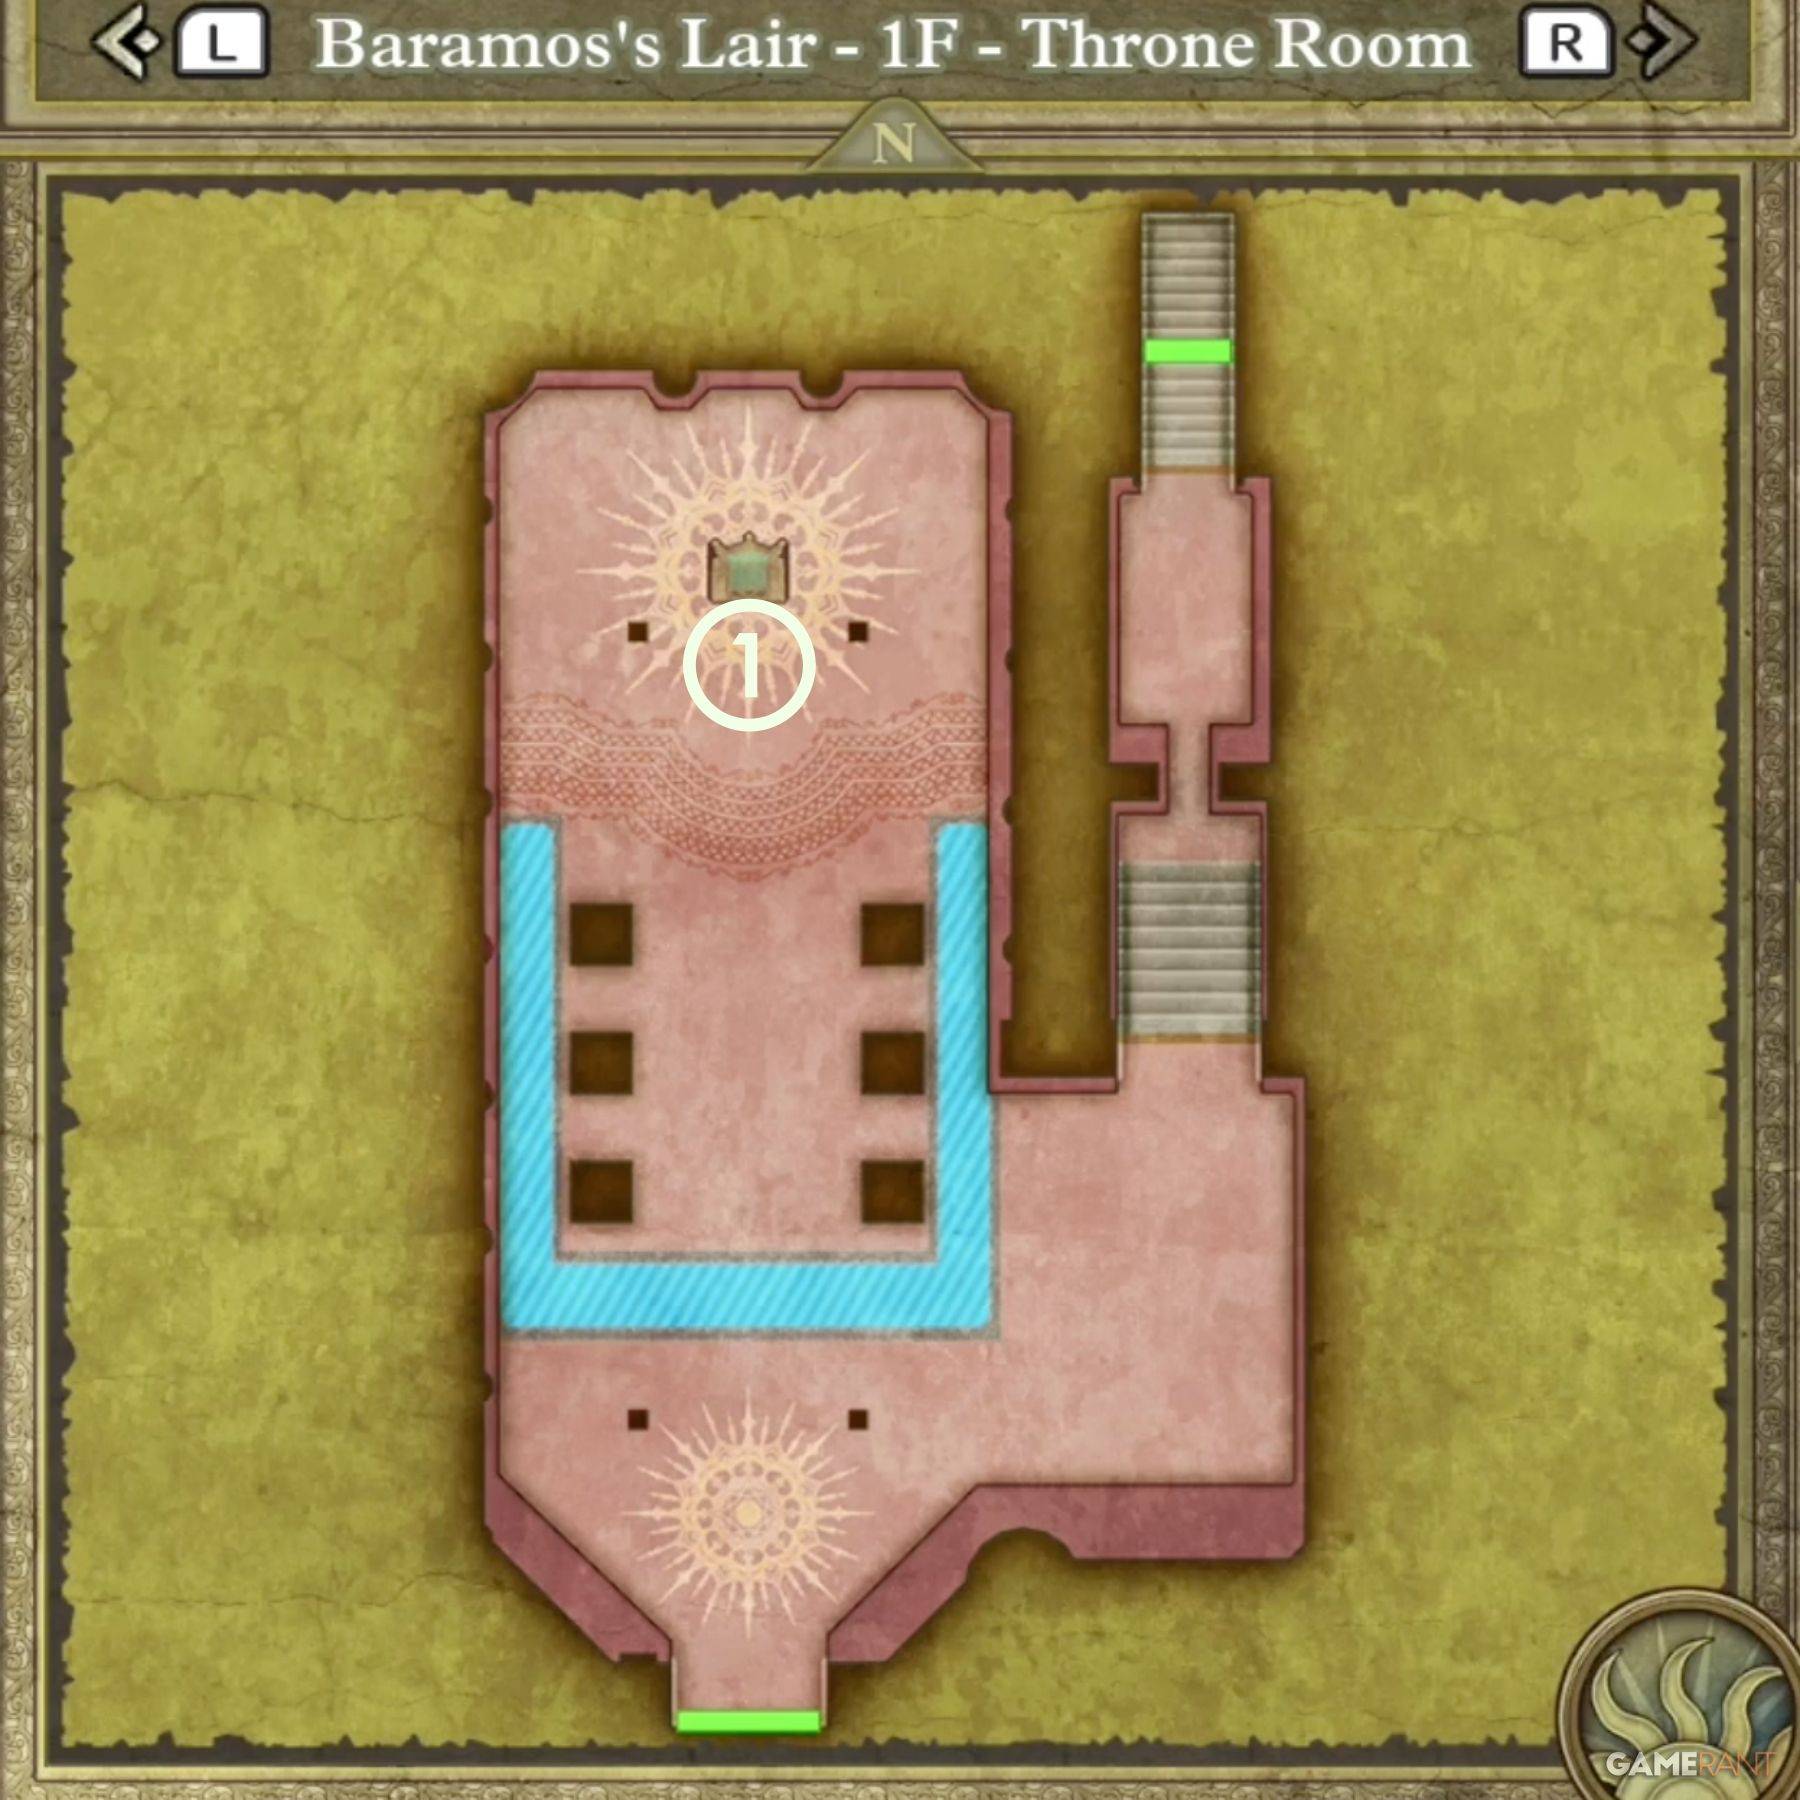
- Treasure 1 (Buried): Mini Medal
Defeating Baramos
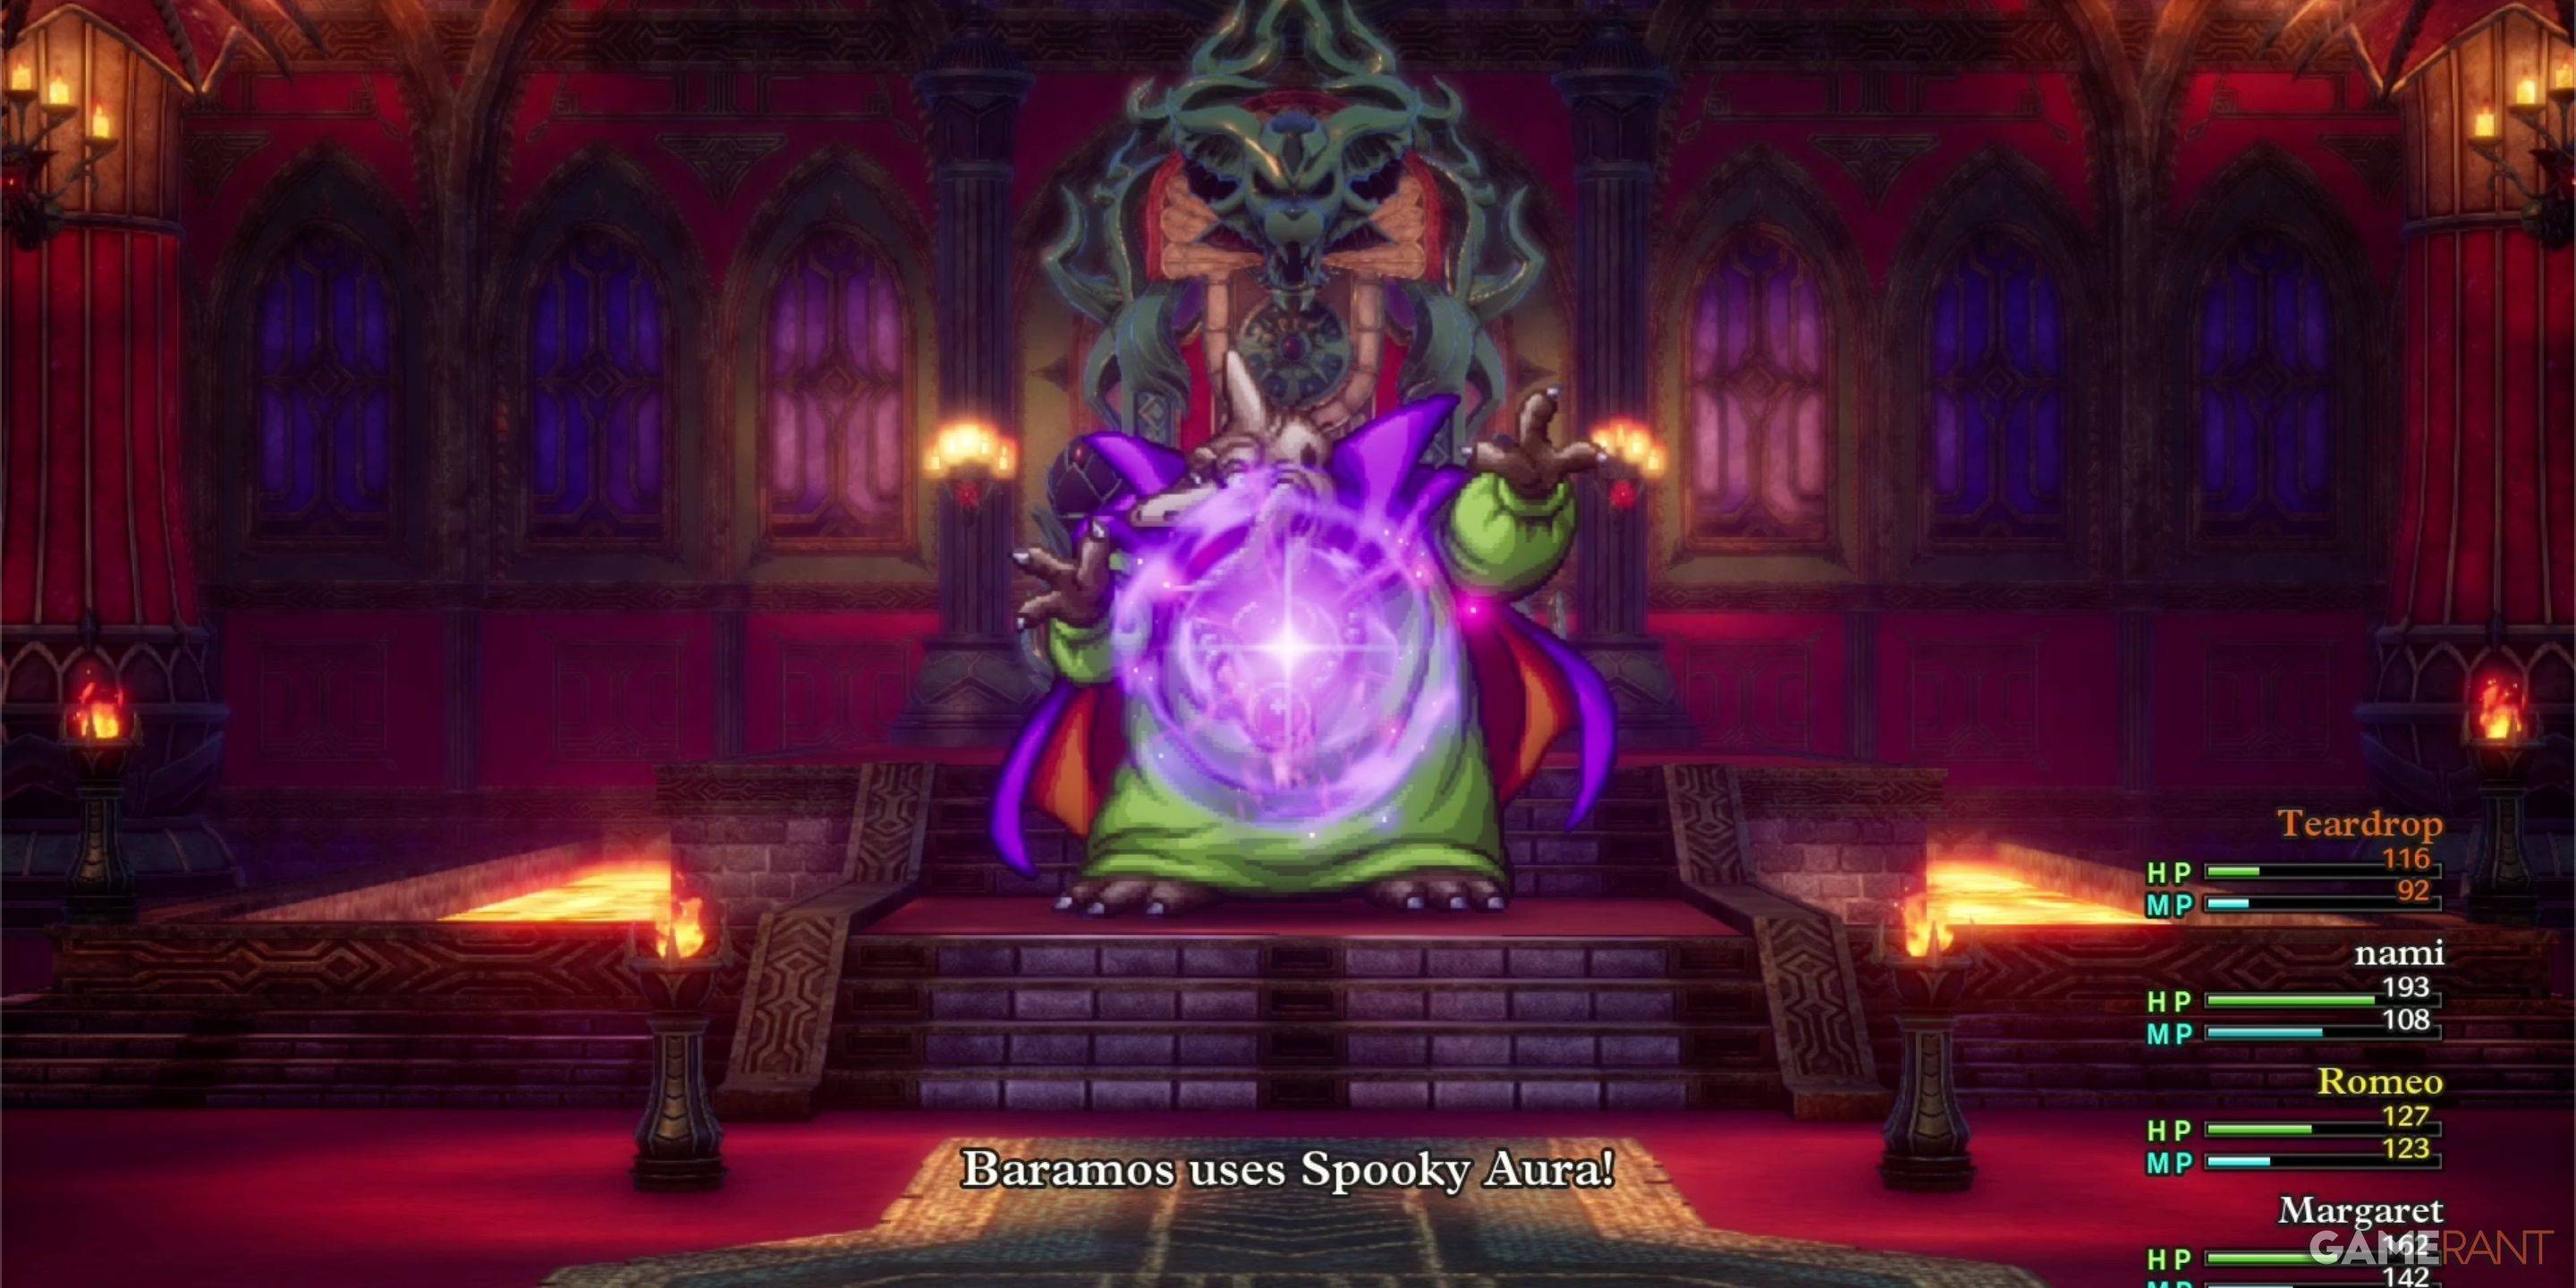
Baramos presents a significant challenge. Strategic planning and adequate party levels are crucial.
Baramos's Weaknesses:
- Crack (Ice-based spells)
- Whoosh (Wind-based spells)
Utilize high-level spells like Kacrack and Swoosh, focusing on offense while maintaining a dedicated healer. Prioritize survival over speed.
Baramos's Lair Monsters
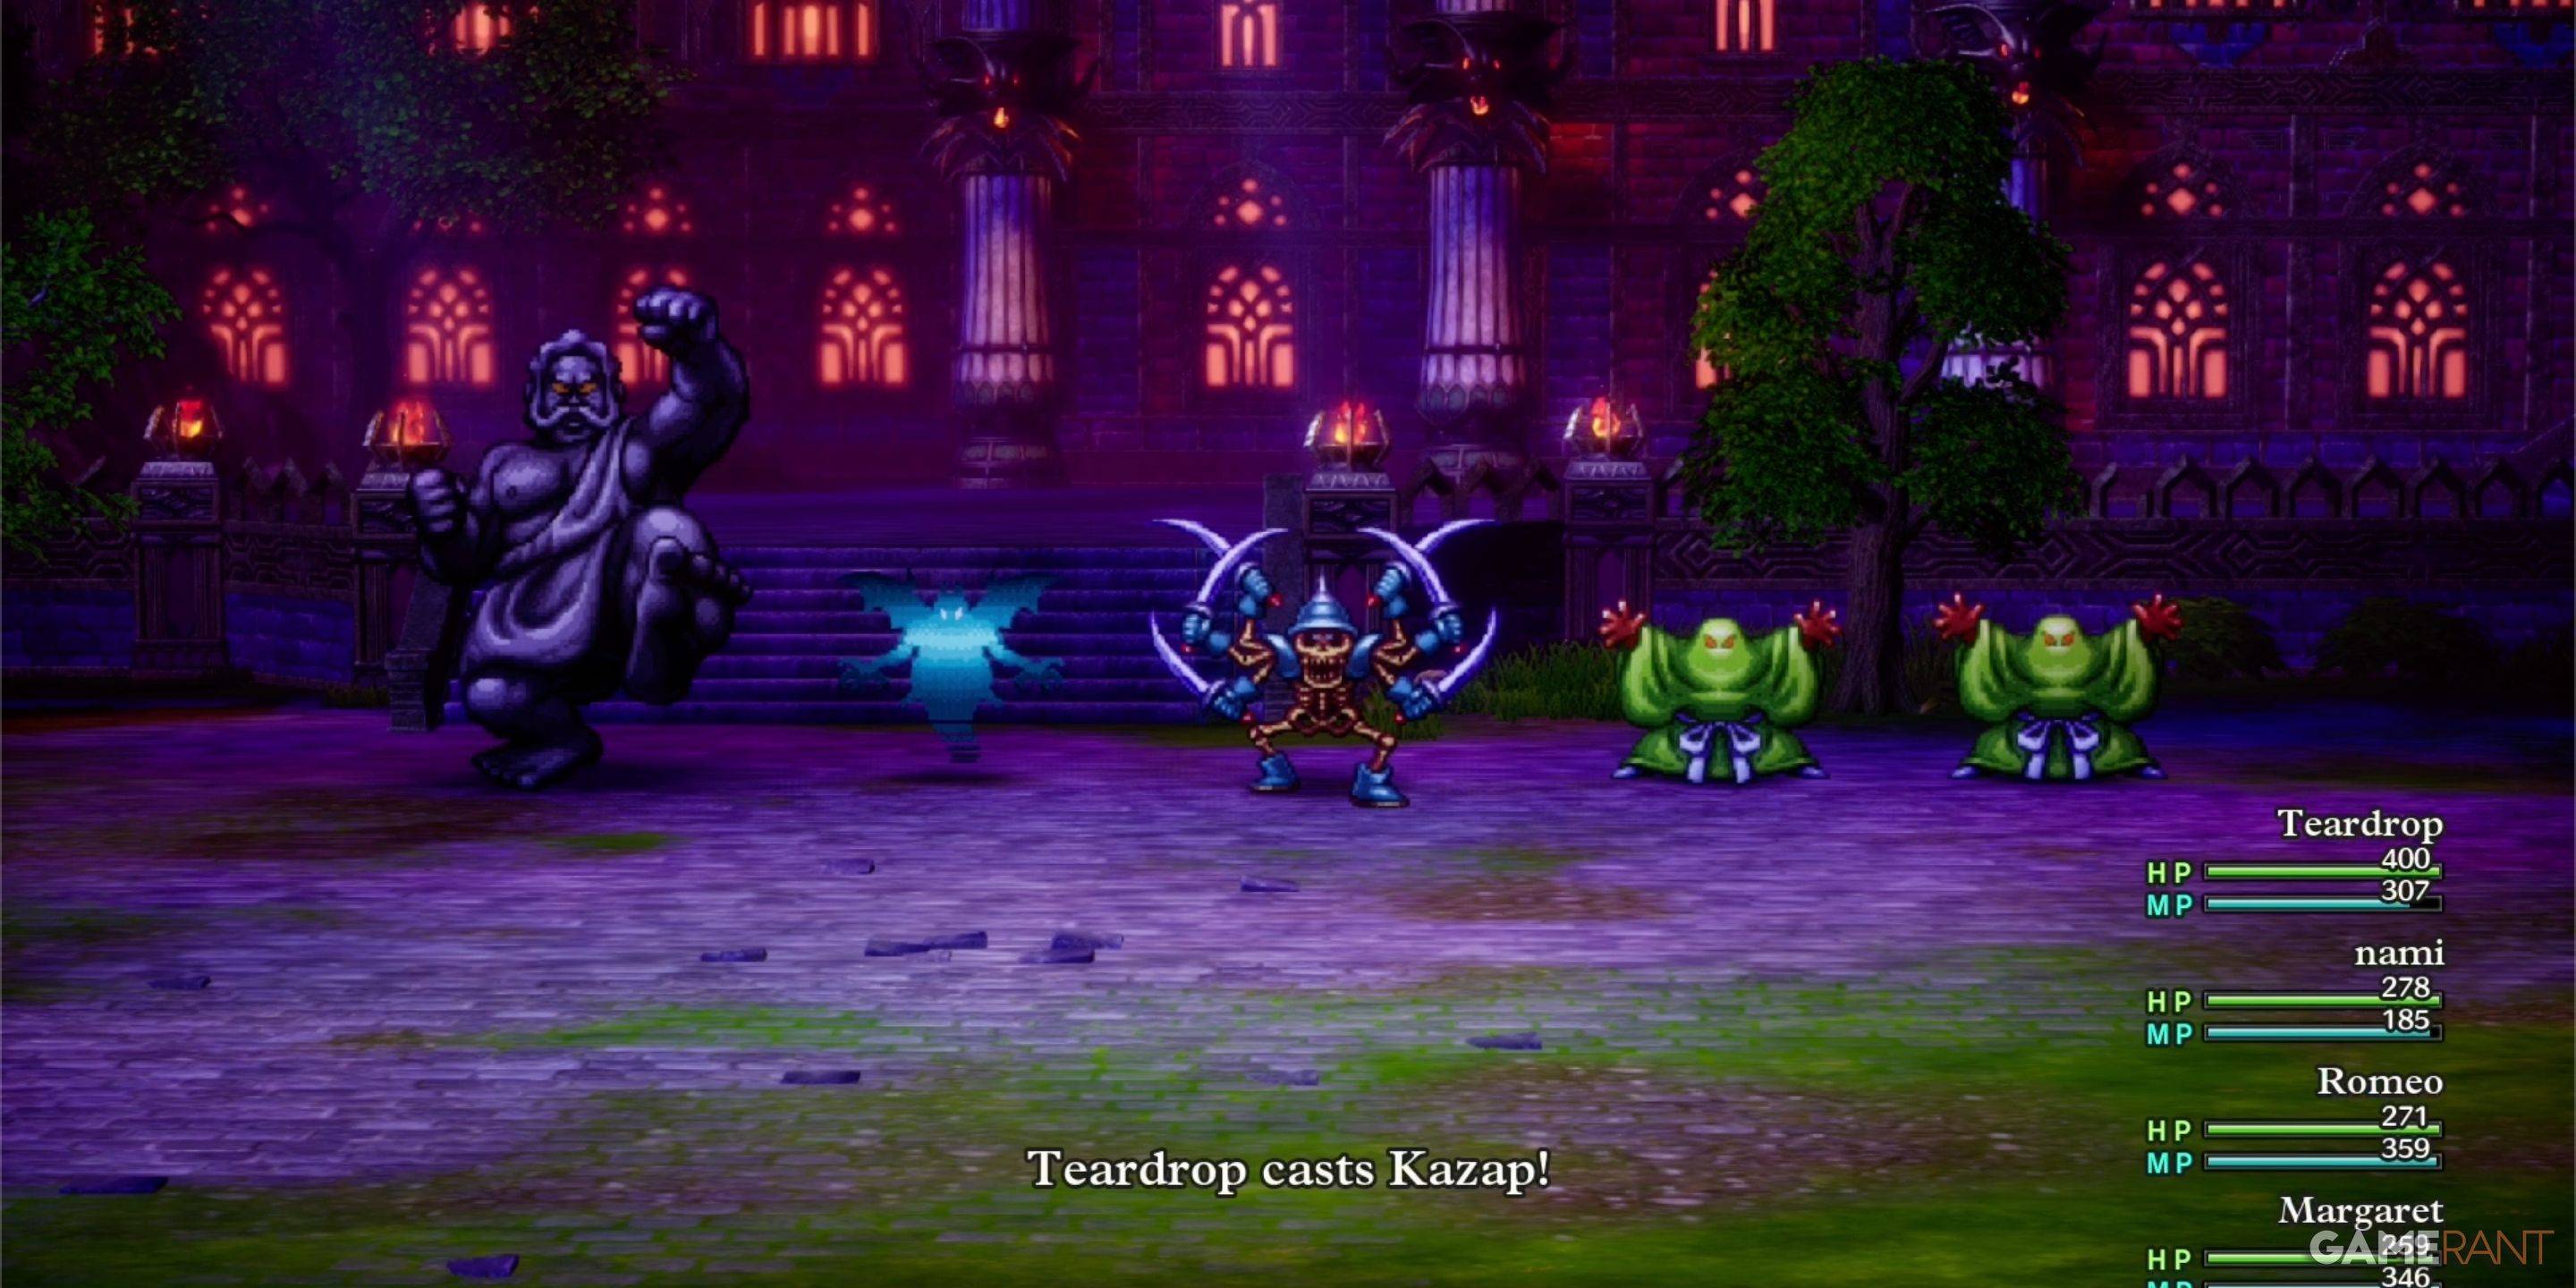
| Monster Name | Weakness |
|---|---|
| Armful | Zap |
| Boreal Serpent | TBD |
| Infanticore | TBD |
| Leger-De-Man | TBD |
| Living Statue | None |
| Liquid Metal Slime | None |
| Silhouette | Varies |
This comprehensive guide equips you to conquer Baramos's Lair and progress further in your Dragon Quest 3 Remake journey. Remember to adjust your strategy based on your party composition and level.
Latest Articles

Firefighting Sim Emergency Call 112 Launches on Android
Emergency Call 112 – The Attack Squad arrives today on Android. Published by Aerosoft and developed by Crenetic, this game plunges you into the life of a firefighter. It was first released for PC in December 2023.What Are the Features?In the mobile e
Stellar Blade Creator Posts Record Year, PC Sales to Top PS5
Shift Up, the developer behind Stellar Blade, has achieved record-breaking financial success with its recent action RPG. The PlayStation 5 exclusive generated an impressive $43 million in royalties, while projections indicate the upcoming PC version
Nonogram Puzzle Game Marks 10 Years on Mobile
Ten years ago, Picture Cross launched as World’s Biggest Picture Cross, designed to be the ultimate nonogram experience on mobile. Today, with more than 10,000 puzzles, Picture Cross is marking its 10th anniversary with fresh modes and even more chal
Sesame Street Finds New Home on Netflix After HBO Max
The journey to Sesame Street continues. The beloved children's series, which first premiered in 1969, will now be available for streaming on Netflix and PBS after HBO and Max concluded their long-term agreement with the show at the end of 2024.New ep
Seven Knights Re:BIRTH: Global Android Pre-Registration Now Open
Netmarble is reviving one of its most beloved mobile RPGs with a fresh twist: Seven Knights Re:BIRTH. Global pre-registration is now live, and we’ve gotten our first glimpse of the game’s reimagined world.
The original Seven Knights launched in Octob
Pixel Starships 2 Android Pre-Register, Demo at Steam Fest
Pixel Starships 2 is coming to Android. Savy Soda's next chapter in their starship strategy series is scheduled to launch in early access this Fall for mobile and PC. Pre-registration is now open on Android for this sequel to the 2016 original.What's
Latest Games

Baalveer New Game
Trivia丨21.2 MB

Pro Pilkki 2 - Ice Fishing
Simulation丨113.5 MB

Rich Monkey
Card丨2.80M

Euchre Classic Card Game
Card丨36.00M


Football Games 2024 Offline
Sports丨49.6 MB


갓오브하이스쿨: 리부트
Role Playing丨175.7 MB

성녀 키우기
Simulation丨1.0 GB


Top News
MORE +


01
02-03
Roblox: Anime Adventures Codes (January 2025)
Anime Adventures Codes: A Comprehensive Guide to Free Gems and Rewards
This guide provides an up-to-date list of working and expired Anime Adventures codes in Roblox. Redeeming these codes grants valuable in-game gems and other rewards, giving you a head start in your adventure.
Updated January 5,
02
05-26
Enhance Your MU Immortal Experience with BlueStacks Features
MU Immortal captures the essence of classic MMORPG gameplay that fans adore—leveling up, enhancing stats, and crafting your ideal character. Designed primarily for mobile, the game truly shines when played on a PC using BlueStacks, thanks to an array of tools that streamline and enhance your gaming
03
05-16
"Clair Obscur: Expedition 33 Hits 1 Million Sales in 3 Days"
Clair Obscur: Expedition 33 has taken the gaming world by storm, achieving a phenomenal opening weekend by selling over 1 million copies just three days after its launch. This remarkable feat cements its status as the highest player-rated game of early 2025. Dive deeper into the journey of this grou
04
04-21
Roblox Anime Genesis: January 2025 Codes
Dive into the thrilling world of Anime Genesis, a dynamic tower defense game on Roblox where you assemble a squad of your favorite anime characters to fend off menacing monsters. Whether you're tackling levels solo or teaming up with friends, you'll earn gems that you can use to summon new heroes, e
05
01-20
New DLC and Preorder for FANTASIAN
FANTASIAN Neo Dimension: DLC and Pre-order Information
While anticipation for extra content is high, a FANTASIAN Neo Dimension DLC or story expansion is unlikely. Mistwalker head Hironobu Sakaguchi has stated his preference against sequels, aiming for complete, self-contained gaming experiences.
Topics
More +